This post is from guest blogger John MacDougall, a technical solutions specialist working in Ontairio, Canada. More of his Excel wizardry can be found at howtoexcel.org.
I use a tool at work called Jira. It’s a tool used for issue tracking and project management in software development. Maybe you’ve heard of it?
I often need to comment on issues in Jira with large tables of numbers to support my findings.
The problem is that making a table in a Jira comment isn’t as easy as copying and pasting it from Excel. The comment system uses its own markup syntax for things like bold, italics, underlines and tables.
Copy and pasting a table from excel
When you copy a table from Excel and try to paste it into a Jira comment, it looks like it might be formatted with a tab delimiter. There’s no table grid, but it could be good enough to read.
When you actually enter the comment, this tab delimiting disappears and the result is just text which can be hard to read.
Jira table markup
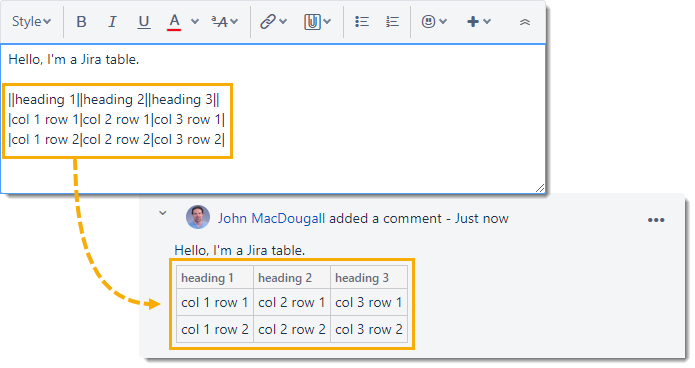
This is where the Jira table markup is needed. Tables in Jira need to use the pipe character | as a delimiter to separate the cells of your table. To distinguish the column headings of your table you can use double pipes ||.
If you separate the items in your table with these special characters, the text will then render as a proper table with grid lines and all when you enter the comment.
The only way to add these pipe characters into your data is manual. Not an option I care for, especially with large tables.
This is where we could use a bit of Visual Basic (VBA) to automatically add the special markup to your data in the copy and paste clipboard.
Using Visual Basic to generate Jira table markup
Sub ExcelToJIRA()

'Declare variables
Dim DataObj As New MSForms.DataObject
Dim c As Range
Dim i As Integer
Dim j As Integer
Dim RowCount As Integer
Dim ColumnCount As Integer
Dim tempText As String
Dim JIRAtable As String

'Get the dimensions of the selected range
RowCount = Selection.Rows.Count
ColumnCount = Selection.Columns.Count

'Set counters to zero
i = 0
j = 0
'Set strings to empty strings
tempText = ""
JIRAtable = ""

'loop through each cell in the selected range
For Each c In Selection

	'if the cell is empty then add a single space character
	'so the cell renders in Jira properly otherwise
	'use the text as formatted in Excel
    If c.Text = "" Then
        tempText = " "
    Else
        tempText = c.Text
    End If

    'Keep track of which row and column we are in
    i = c.Row - Selection.Row + 1
    'Current column
    j = c.Column - Selection.Column + 1

	'If we're in the firts row use double pipes
	'otherwise use a single pipe
    If i = 1 Then
		'If we are at the last cell in the column then close with pipes
		'and add a line break
        If j = ColumnCount Then
            JIRAtable = JIRAtable & "||" & tempText & "||" & Chr(10)
        Else
            JIRAtable = JIRAtable & "||" & tempText
        End If
    Else
		'If we are at the last cell in the column then close with pipes
		'and add a line break
        If j = ColumnCount Then
            JIRAtable = JIRAtable & "|" & tempText & "|" & Chr(10)
        Else
            JIRAtable = JIRAtable & "|" & tempText
        End If
    End If

Next

'Add the text to the clipboard
DataObj.SetText JIRAtable
DataObj.PutInClipboard

End Sub
This code will loop through the range selected in Excel and add in the appropriate pipe characters between cells in the table. It also adds in line-break characters to the end of each row then copies the result into the clipboard so it can be pasted into any other application.
Any number formatting in Excel is preserved into the clipboard as we use .Text instead of .Value to reference the cells in the range.
Where do I put this code?
You’re definitely going to want to put this code in the personal marco workbook. This will allow you to use it from any Excel workbook open on your computer.
Open up the Visual Basic Editor. The quickest way to do this is press Alt + F11 on the keyboard.
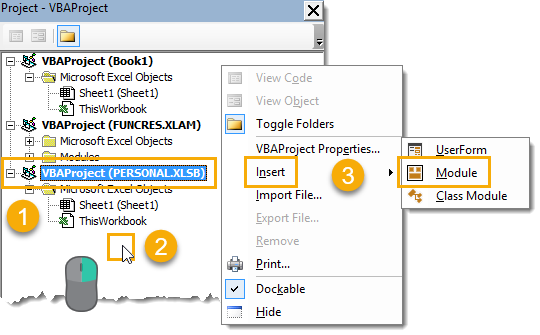
Go to the Project Explorer and locate the VBAProject (PERSONAL.XLSB) project. Underneath this, right click, and Insert a new Module.
If you don’t see the project explorer, you can go to the View menu and select Project Explorer from the menu or use the Ctrl + R keyboard shortcut to show it.
Now all you have to do is Select the module and paste in the VBA code in, then save the project. You can now close the Visual Basic editor.
Enable the Microsoft Forms Object Library
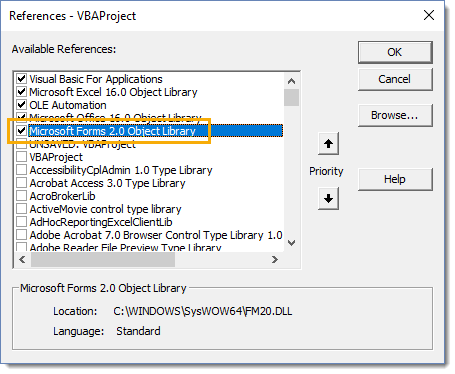
This VBA procedure makes use of the Microsoft Forms 2.0 Object Library to copy into the clipboard. You’re going to need to enable this as it’s not enabled by default.
While in the visual basic editor, go the Tools menu and select References. Now check the box next to Microsoft Forms 2.0 Object Library and press the Ok button.
If you don’t see this object library in the list, there’s a trick you can use to enable it. Right-click in the project explorer and insert a UserForm. This will automatically enable the library. You can then delete the user form and the library will stay enabled.
How to use the code in a Jira issue
Ok, so the code is now stored in your personal macro workbook, which means you can access it from any Excel file you open on your computer. But how do you use it?
The best way is to add it to the quick access toolbar, so it’s always easily accessible. This is the area in the top left of the Excel window and contains a save, undo and redo command as the default options.
You can read this post for the full details on adding a macro to the quick access toolbar. I used the Modify button when selecting the macro as an extra step to change the icon and display name for the toolbar.
Now all you have to do is select the range you want to copy into Jira then click on the macro in the quick access toolbar. This will copy the range into the clipboard with the Jira markup, and you can head over to Jira and paste it into a comment.
. . .
For more time-saving tips from users like John, head to Atlassian Community where you’ll find articles, Q&A, and more.


