End-to-end Demo
An end-to-end demo is a visual representation of the final product or service that will be delivered and how customers will interact with it.
USE THIS PLAY TO...
Visualize your solution so it's easier for customers and stakeholders to understand what you'll deliver and provide feedback.
If you're struggling with one-pager, or proof of concept on your Health Monitor, running this play might help.

People
3 - 6

Time
30 min

Difficulty
Moderate
Running the play
Depending on the project, your demo may take the form of sketches or diagrams, a working prototype, new functionality, or a new product. The key is to iterate on it as your project takes shape.
Materials
Paper
Whiteboard
Markers
UI mock-ups
Video
Step 1
Create your end-to-end demo
An end-to-end demo typically starts off as a high-level, low-tech, low-fidelity visualisation of the solution you have in mind – e.g., a diagram or sketches of UI screens on a table napkin. For an existing product or service, your demo should also reflect how your work will fit within the current experience.
As the project becomes more clearly defined, the demo matures – similar to iterative prototyping. It's critical that it shows how a user discovers the product, feature, or service, how they interact with it, and how they leave. Otherwise it's not end-to-end.

Anti-pattern
Nooooooooo! Start scrappy, and above all, be real. Get something out quickly that sparks conversation, and don't worry about finessing it.
Step 2
Demo your demo (30 min)
Set aside 30 minutes with the core project team, stakeholders, and your executive sponsor if you have one. It's ok to focus on what's changed since the last demo, but do walk through the full thing end-to-end so everyone stays grounded in the entire customer journey and where your project fits into the bigger picture.
If you're working on a high-profile and/or long project, consider pairing this with the Demo Trust play so you can get feedback from your leadership team when you're still in envisioning mode.

For example...
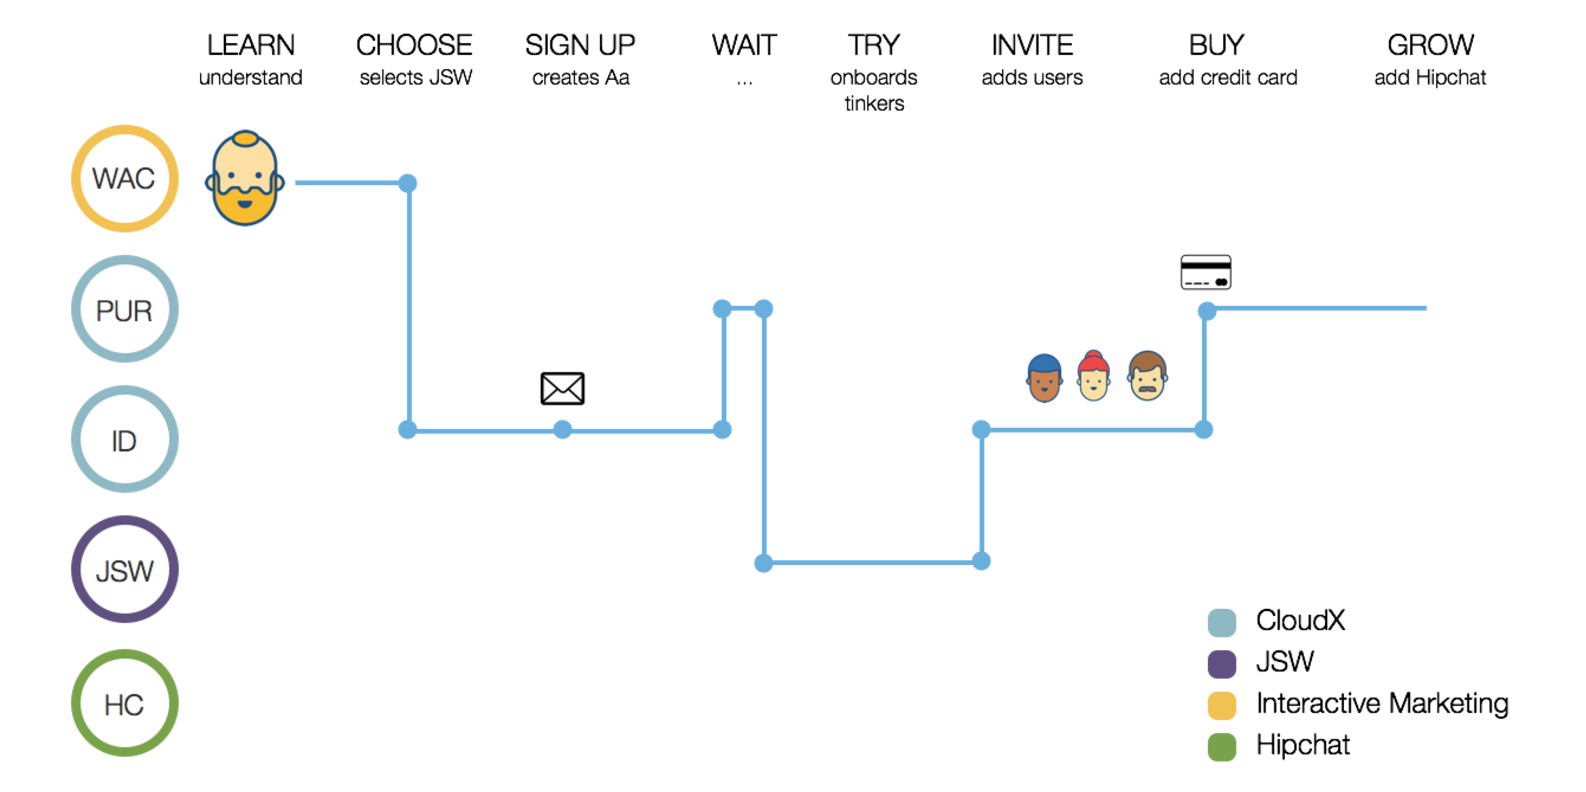
In their early days, the team working to unify sign-ups for our Cloud products used this map as their end-to-end demo.
Step 3
Evolve your demo
As you learn more about your problem space, get feedback from your team, and (most importantly) test with your customers, your end-to-end demo will evolve. Because you're making progress. Awesome. Consider running the Journey Mapping play as well if your project is big or tackles a really gnarly problem.
Then onward to execution mode: workflows, wireframes, snippets of working code in a prototype... whatever. If you can skip any of these steps, great. Your customer wants a working solution that meets their needs – not a demo. So go for it. The important thing is to implement something as soon as possible and iterate on it until you're ultimately ready to deliver it to your customers.
Nailed it?
Be sure to run a full Health Monitor session or checkpoint with your team to see if you're improving.
Variations
Demo the status quo
...and why the current state sucks. A screen-capture video is great for this, as you record the flow with a commentary that brings the customer's pain to life.
E.g., "The user usually comes to the site through a Google search and lands on the homepage. Then if they're lucky they'll find this link. They click it and then they get this page. They might know that what they're looking for is over here, in this group of quick links. If they find the quick link, they get this screen. They click here. They have to enter more information. They click enter. But they're still not finished, so they...." ...you get the idea.
Demo as experiment
Create a demo that reflects an improved experience. Make sure it's lightweight so you can implement it quickly and immediately. If the experience doesn't improve, kill the experiment and stay with the existing solution.
Follow-ups
Break up your end-to-end demo into multiple shippable iterations, indicating how each iteration contributes to the final product.
Want even more Playbook?
Drop your email below to be notified when we add new Health Monitors and plays.
Got feedback?
Drop a question or comment on the Atlassian Community site.
