Organize structured data with databases
According to Gartner, the average desk worker relies on 11 applications to complete their daily tasks. With so many tools at our disposal, it's no wonder that many workers struggle to stay organized and productive. The constant toggling between different apps can lead to distractions, confusion, and, ultimately, a decrease in efficiency.
This is where Confluence databases come into play, offering a centralized solution for you to create, manage, and contextualize all of your important information in a clear and organized manner.
In this piece, we'll delve into the fundamentals of getting started with Confluence databases. Whether you're new to Confluence or looking to optimize your existing workflows, we'll provide step-by-step guidance to help you unlock the full potential of Confluence databases.
What are Confluence databases?
A database is a structured collection of information. In Confluence, databases serve as organized repositories within the platform, facilitating the systematic storage, retrieval, and management of diverse data sets. These structured databases empower teams to efficiently structure, reference, and display information, offering a centralized and customizable solution for collaborative workspaces.

Teams can utilize Confluence databases to create a comprehensive information repository and aggregate tools, links, and data from internal and external sources. This consolidated view can be customized to meet specific needs, serving as a centralized hub for accessing and managing content.
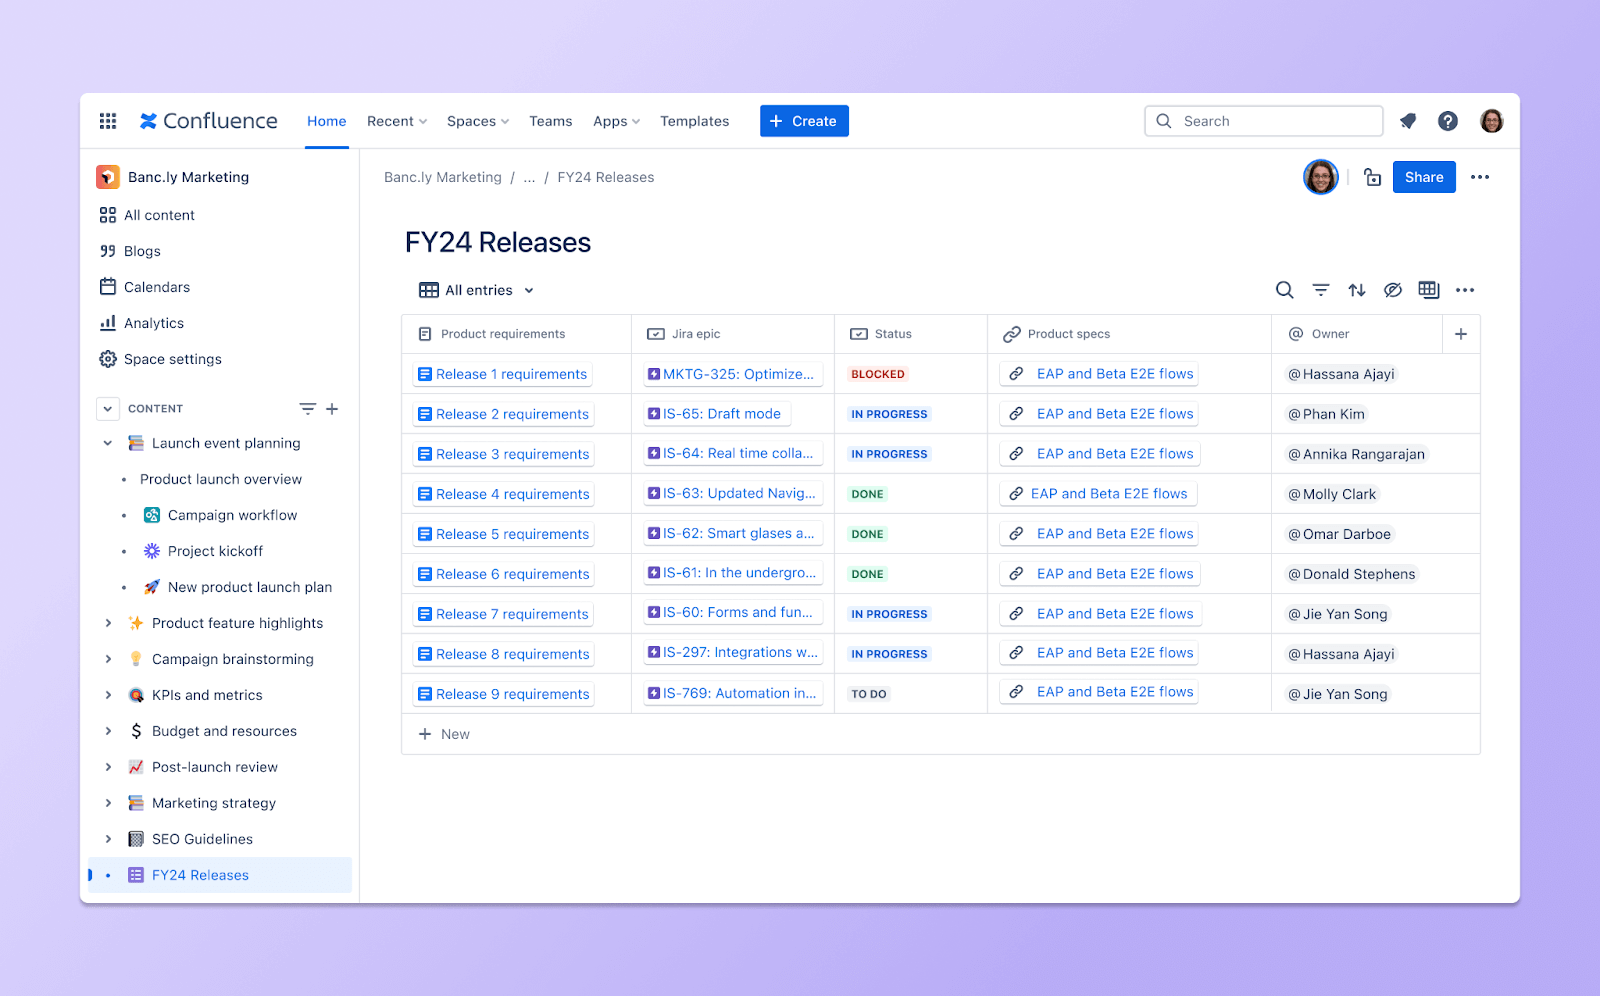
For example, you could use databases to store and categorize information related to various projects, such as project plans, meeting notes, owners, and relevant Jira links. You could also use databases to store and share important company policies, procedures, and guidelines.
Confluence databases offer several benefits:
- Seamlessly connect and structure information: Confluence databases make it quick and easy for multiple teams to store and access data simultaneously. The structured format and pre-defined field types keep inputs consistent, ensuring uniformity and clarity across entries.
- Obtain a curated view of relevant work: Confluence databases allow you to bring in information from multiple sources, including Jira tasks, Confluence pages, and external data, and combine them into a curated view. This curated view provides a comprehensive perspective on your project landscape, enabling you to focus on the work that is most relevant to your goals and objectives. By aggregating and organizing data in a centralized database, you can easily access and manage the information that matters most to your team's success.
- Stay up-to-date: Real-time syncing between entries ensures that you and your team always have access to the most current information – no more outdated spreadsheets and manual updates.
- Customize data display: Tailor the display of information to suit your preferences. With sorting and filtering options, you have the power to create a personalized view that suits your unique needs. Whether in tables, cards, or boards, Confluence databases offer flexible information presentation options that enhance data visualization.
With Confluence databases, say goodbye to information overload and hello to a streamlined, organized, and collaborative workspace. It's time to take control of your content and elevate your team's productivity to new heights.
Steps for using Confluence databases
Ready to harness the full potential of Confluence databases? Follow these six simple steps to get started.
Step 1: Create a database
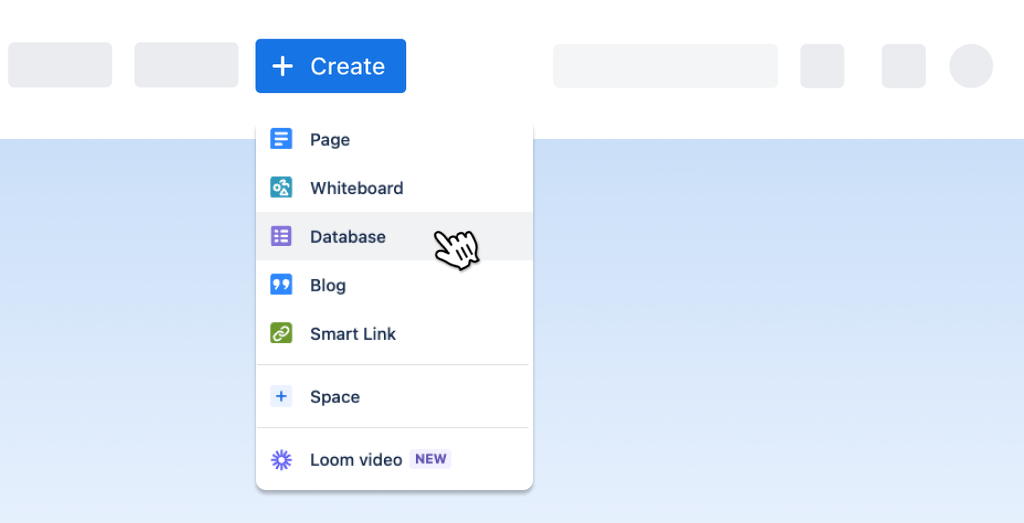
There are three ways to create a database in Confluence:
Option 1: Go to the Create button in the navigation menu and select Database. This will create a database in your current space or default to your personal space if you have edit permissions.
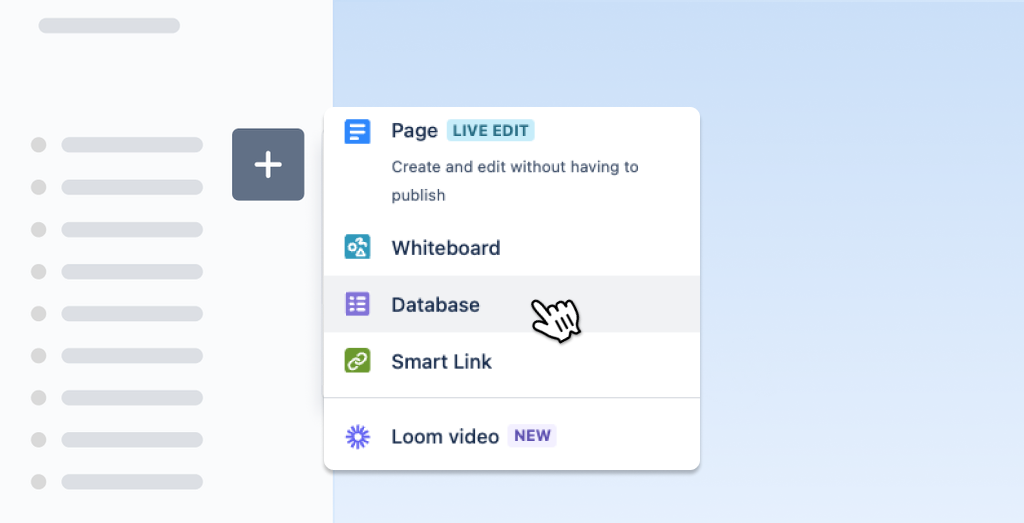
Option 2: Head to the Content section in the space sidebar and click on the + button. Choose Database to create a database in your space. You can also create a database under a specific item in the content tree by hovering over its title in the sidebar and clicking on the + button.
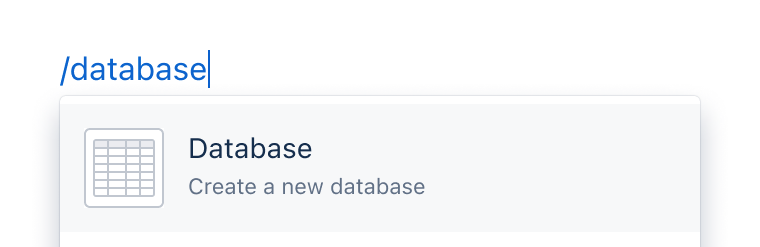
Option 3: While editing a page, click on the + button in the toolbar. Look for the option to Create database or simply enter “/database.” This will create a new database as a child of the page you're currently editing and automatically add it as a SmartLink on that page.
Step 2: Add field types
Once you’ve created a database in your space, you can start adding field types to organize and structure your data. Field types allow you to define the type of data that can be stored in a particular field, such as text, numbers, dates, or images. Using field types, you can easily sort, filter, and search for specific information in your database.
To add a new field:
- Within the table layout, click on the + button located in the top-right corner of the database.
- Search for the desired type of field or select it from the available options.
- Assign a name to the field.
Step 3: Add Confluence to your database
Pages are the place to capture all of your essential and non-essential information. All you need to do is create a page from a database, and you're ready to go.
When you create a page from a database, you're inherently linking your pages to an entry. This process not only centralizes all of your information in one place but also makes it easily accessible for anyone with access to the database. This centralized approach is particularly beneficial for collaborative projects, facilitating easy access and contribution by team members to the same database.
Moreover, by linking Confluence pages to specific entries in your database, you can enhance the context and information available for your data. This integration allows you to pull in metadata from those pages, such as page status, labels, and details, enriching the understanding of your data within the database. Leveraging this feature ensures that your database entries are infused with relevant and up-to-date information from the linked Confluence pages.
Step 4: Add entries and values
When working with databases on a page, you have the flexibility to add or modify entries and their corresponding values.
Each field represents a specific item or category, and the corresponding values provide information about that item or category. You can add multiple entries and values to your database, making it a comprehensive and organized tool for storing and managing your data.
Here's how to add an entry to the database:
- Click on + Add entry located at the bottom of the database.
- Input the values for the new entry.
- If you're using the table layout, you can directly enter or update values within the table.
- For the card or board layout, an entry panel will pop up, allowing you to input the necessary information.
Step 5: Create layouts and views
How your information is presented can greatly impact your team's efficiency. With database layouts and views, you have the power to personalize how your database appears and optimize the way you interact with your data.
Layouts: Select the way your database is displayed by picking one of the layouts in the menu:
- Table: Structure your content in a table format, providing a clear and organized view of your entries.
- Card: Display your entries as separate cards, allowing for a more visual representation of your data.
- Board: Create simple Kanban workflows with columns based on a single field in your database, enabling you to track the progress of your entries.
Views: In addition to layouts, you can create saved views to have more control over the appearance of your database. Saved views allow you to define various options, such as layout, filtering, sorting, and visible fields, that will be applied consistently across all instances of that database.
To create saved views:
- Go to the desired database.
- Define your preferred layout, filtering, sorting, and visible field options.
- Open the view selection menu in your toolbar.
- Click on “Add view.”
- Give your new view a name.
By customizing your views, you can tailor the presentation of your data to meet your specific needs. Any modifications made to a view will be reflected in all links and embeds that utilize that particular view, ensuring consistency across your Confluence pages and spaces. This flexibility allows you to optimize your database for different use cases and easily switch between views to access the information you need.
Visual collaboration with whiteboards
Learn how Confluence Whiteboards enables visual collaboration.
CONFLUENCE APPS AND INTEGRATIONS
Learn how to integrate Confluence with your favorite business tools.