Everything you need to know about getting started with Assets for Jira Service Management Data Center.
Getting started with Assets for Jira Service Management Data Center
This guide is for anyone getting started on setting up Assets for Jira Service Management Data Center. With Assets, teams can track their assets, configuration items, and resources to gain visibility into critical relationships between applications, services, underlying infrastructure, and other key assets. Assets are built on Jira, giving teams a simple and quick way to tie assets and configuration items to service requests, incidents, problems, changes, and other issues to gain valuable context.
Step 1 - Installation
If you are using Jira Service Management Data Center 4.15 or above, the Assets functionality is already included when you download the file.
If you are using Jira Service Management Data Center 4.14 or earlier, you need to install the free Assets app:
- Log into Jira Service Management as a user with the Jira Administrators global permission.
- Click the admin drop-down and choose 'Manage apps.'
- Click 'Find new apps' from the left-hand side of the page and search for 'Assets.'
- The appropriate app version appears in the results.
- Follow the instructions to install the app.
- You’ll be prompted to log into MyAtlassian and Assets will begin to download.
Step 2 - Understand how Assets is structured
This section will give an overview of how the Assets database is structured.
Objects
Objects are your actual assets/configuration items. These can be linked to your Jira issues so whenever an issue comes in, the issue immediately has more context.
They can also be linked with each other using object references to show how objects depend on each other.
Object Schemas
An object schema is the actual configuration management database (CMDB) that contains your object types (more on those below) and objects. You can create multiple object schemas in Assets which is useful for a number of reasons:
- Breaking data into smaller chunks helps with auditing the data and keeping it accurate.
- If you have sensitive data, e.g. employee information, it may be simpler to keep all that data together in one object schema with restricted access permissions.
When deciding how to put data into Assets, consider the uses of the data and who will update it so the data can be grouped into logical object schemas.
Assets (and by extension Jira Service Management) does not care about which information is contained in which object schema. It just sees one big pool of data. This means you can easily use multiple object schemas for one use case and create links between objects in different object schemas.
Object Types
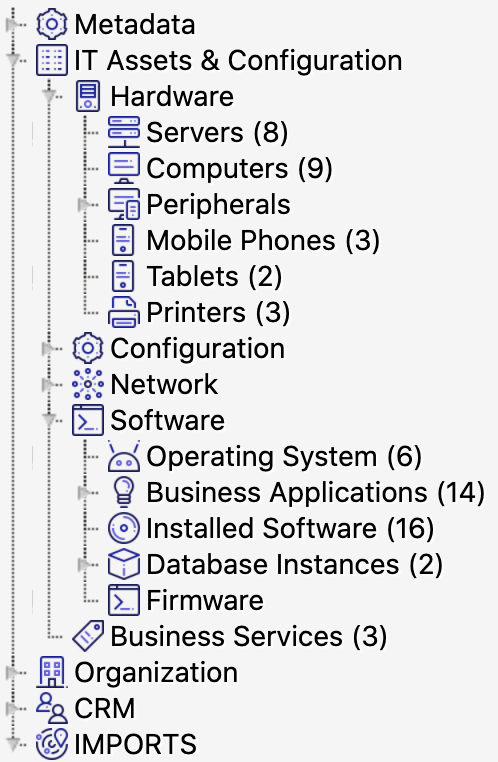
Object types go within a schema and define the objects that the schema contains. You can define these yourself or you can use an object schema template that will come pre-populated with certain object types that you can customize. Object types act as containers for your actual objects. Object types can be whatever you want them to be as Assets is very open and flexible but common object types include:
- Business services
- Hosts
- Laptops
- Software
But they don’t have to be IT assets. For example many people add other useful information such as:
- Vendors
- Locations
- Employees
- Business Priority
You can organize object types in the hierarchy tree in a way that makes sense. This tree is mainly for navigation and readability and you can have empty object types to aid this, but it can be setup to offer inheritance of attributes to make creating object types easier.
Object Type Attributes
Object attributes are what define an object type. Each object type will have its own set of attributes. For example, the object type “laptops” might have the attributes: model, serial number, user, warranty expiry date etc.
Entering actual values for the attribute will define an object. This can be done manually or automatically (see Step 4).
All object types will have four mandatory attributes:
- Name
- Key
- Created Date
- Last Updated Date
The last three are set automatically. Every other attribute can be defined by the admin. And because there’s a unique key attribute, the name of each object does not need to be unique.
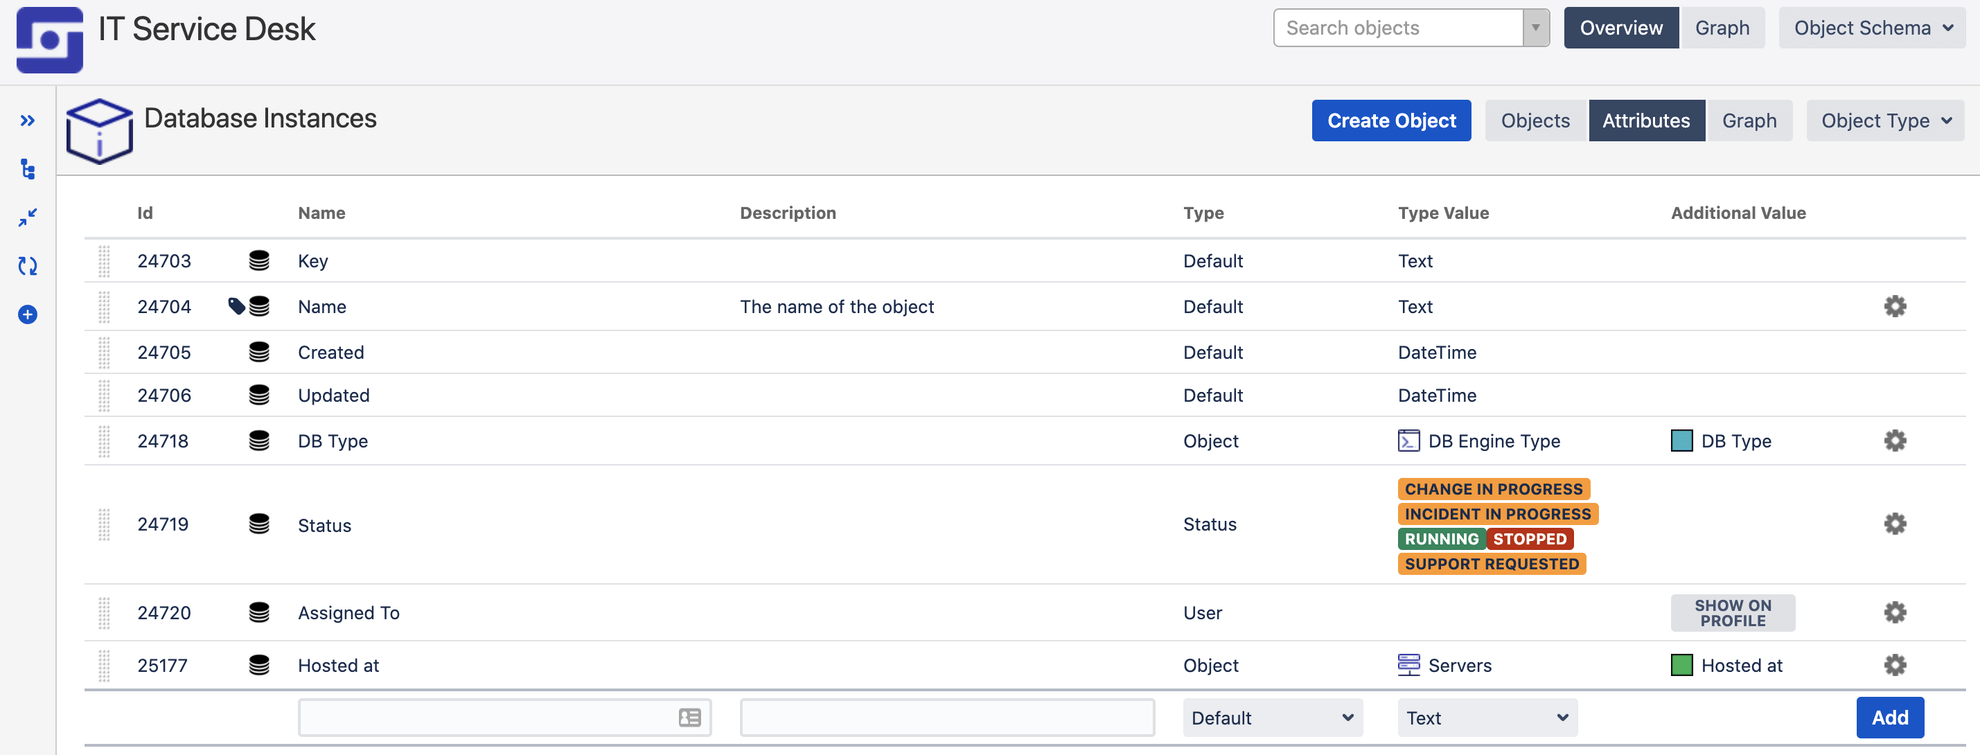
Attributes can comprise of many different data types including text, dates, numerics, URLs (great for linking to other stores of information or service contracts), Jira users (excellent for setting ownership of objects), statuses (in stock, assigned, retired, etc.), and other objects (more on this in the next section).
Object References
An object attribute to call out specifically is the attribute type of “object.” This creates a reference to other objects and it is how you start building a map of dependencies between your objects.
For example, if location is its own object type, then each location object can be one of your business' office locations. This allows you to quickly set the location for every laptop by selecting “Stockholm” for example.
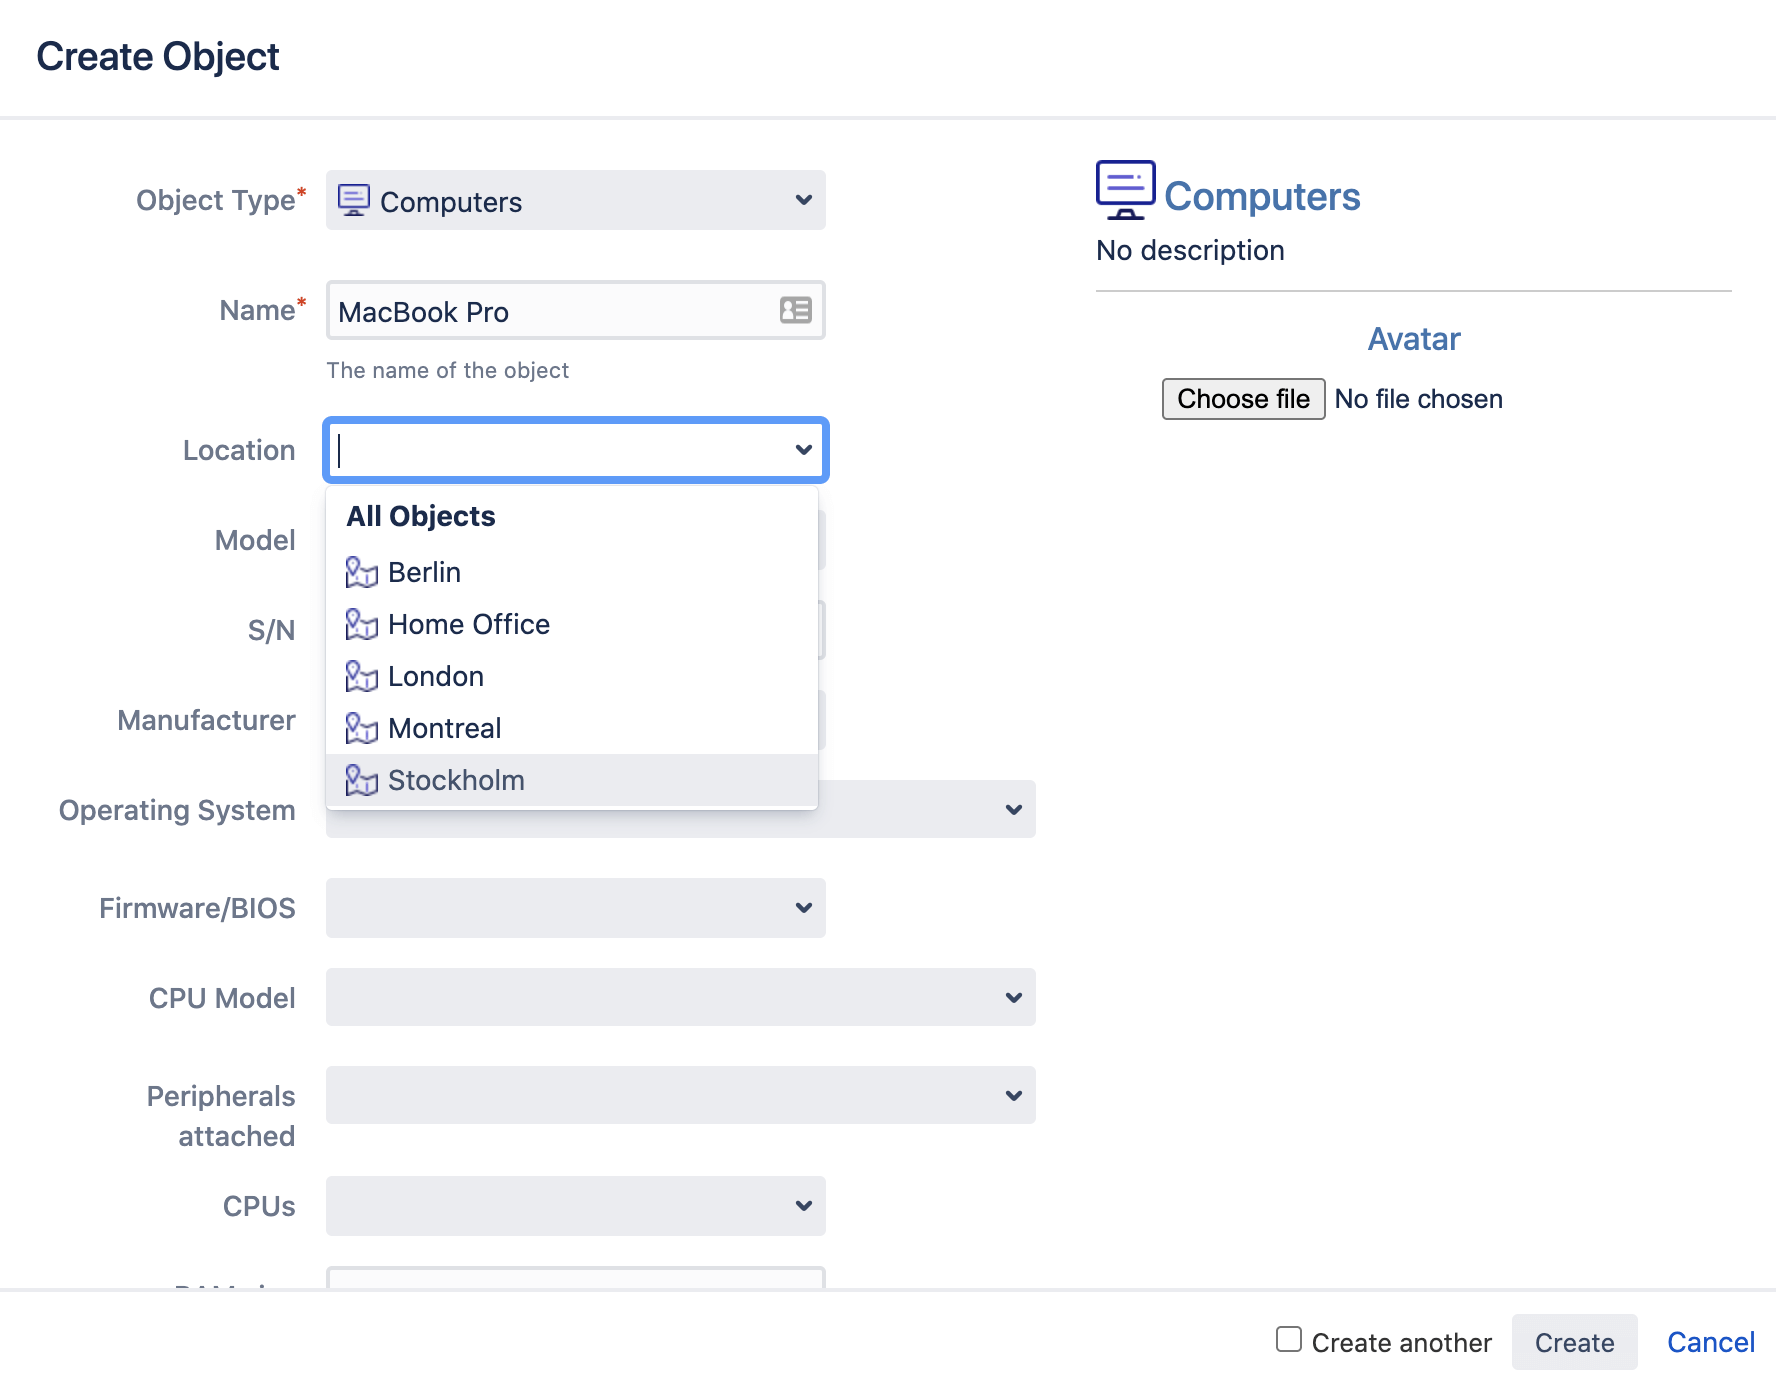
Object references don’t have to bet set manually. They can be added automatically from network scanners, importers, automation rules, etc. See step 4 for more details on these.
References between objects have two main benefits:
Major benefit - You can map dependencies between your objects. For example, you can map your business services to the different hosts, operating systems, and files they depend on. This map can be incredibly useful for understanding the downstream effects of changes (if I change this OS, what might be impacted?), as well as finding the causes of incidents and problems. And because each object can be linked to a Jira issue, over time you build up a comprehensive history of your infrastructure or other business assets which further helps with solving issues and problems.
Minor benefit - It is easier to manage. If an office moves from say Montreal to Toronto, you only need to update the object Montreal rather than go through each laptop changing Montreal to Toronto.
There are two types of object references:
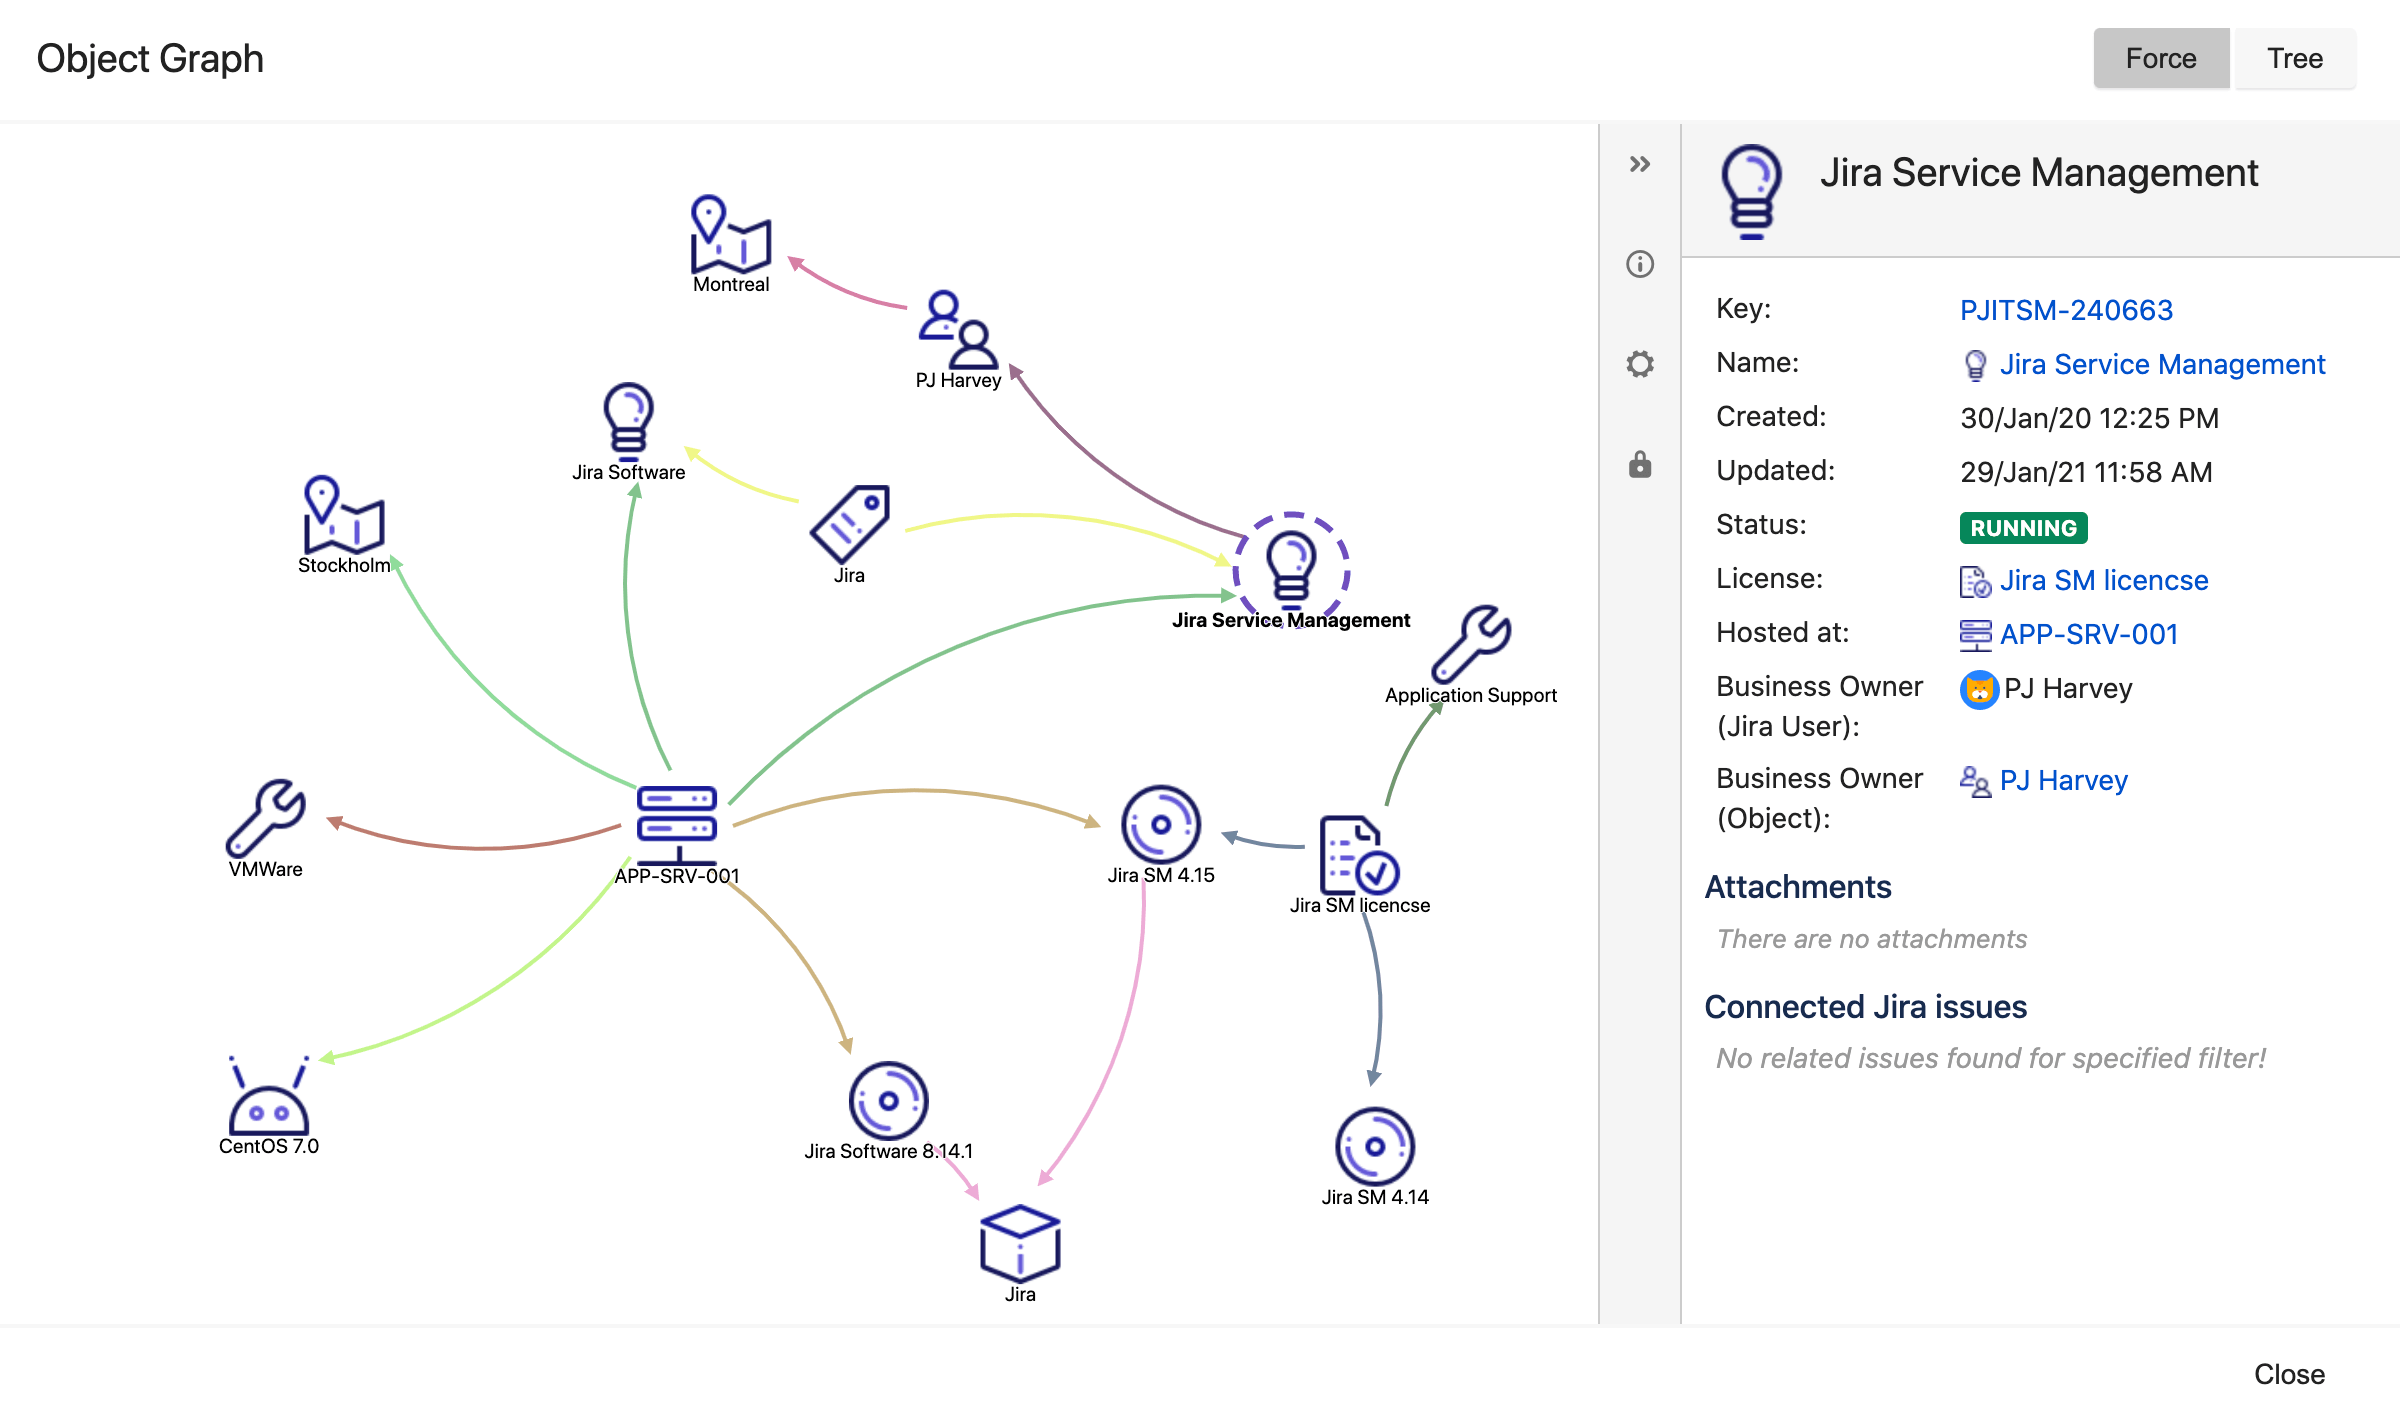
- Outbound references are references from the current object to other objects.
- Inbound references are other objects that refer to the current object.
References between objects can be viewed using the graphical viewer. You can decide what reference types you have (e.g. installed on, owned by, vendor) and you can color code these in the object schema settings.
Assets Permissions
Assets has three types of permissions
- Global Permissions - In global settings, you can specify who should have administrative permissions in Assets. People assigned to the “Assets Administrator” role can perform all actions within Assets.
- Object Schema Permissions - In object schema settings, you can define who has administrative permissions for a particular object schema, who can update object schema data, and who can just view the data.
- Object Type Permissions - Sometimes you might want Jira Service Management customers to only see certain information in an object schema but you don’t want to give them access to view all the data within the entire object schema. You can use object type permissions here.
Step 3 - Choose what data to include
Every instance of Assets will be unique as every company requires different information to be tracked. Assets can store any piece of information that is useful for you and your business to know and understand.
What specific assets or configuration items you should include will depend on what you are trying to do. An Assets instance for inventory management is going to look very different from one used to map business services and their dependencies for making changes and solving incidents faster.
Here is our top advice for deciding what data should be included:
Define your problem
Most tools are implemented to solve a problem, and Assets is no exception. It could be that your incident resolution time is not as fast as you’d like, or perhaps changes to a specific service often cause unexpected outcomes because you can’t easily see service dependencies.
Find your problem and use that to define everything else, from who you involve to what assets and information you include in your database. Look at the problem and understand what extra information staff need to help them overcome it. This information will define your object types.
Adding too much information at once can make it tough to check accuracy so try to focus on one problem at a time. Once your first problem is solved, Assets can grow to solve other problems.
Start with services
For configuration management uses, we recommend starting with the services related to the problem you're trying to solve. Services are well defined, and it’s relatively simple to start adding the various assets they depend on to run, and in turn, the assets that those assets depend on, and so on. Eventually, you’ll build up a complete picture of each relevant service and its dependencies.
You do need to decide how deep to go. Realistically think how much detail you need to understand your services. Mapping the specific racks and cables will be too much detail for some, but for others, that may be required.
You also don’t need to do all of your services at once. You could start with just your business critical services or those that are having the most downtime.
Starting with services gives a defined set of assets/configuration items to start with. You can then add other assets as needed, when new problems arise. It’s best to build your CMDB bit by bit as it’s easier to confirm the accuracy of small chunks of data than your entire infrastructure and assets all at once.
Use object schema templates
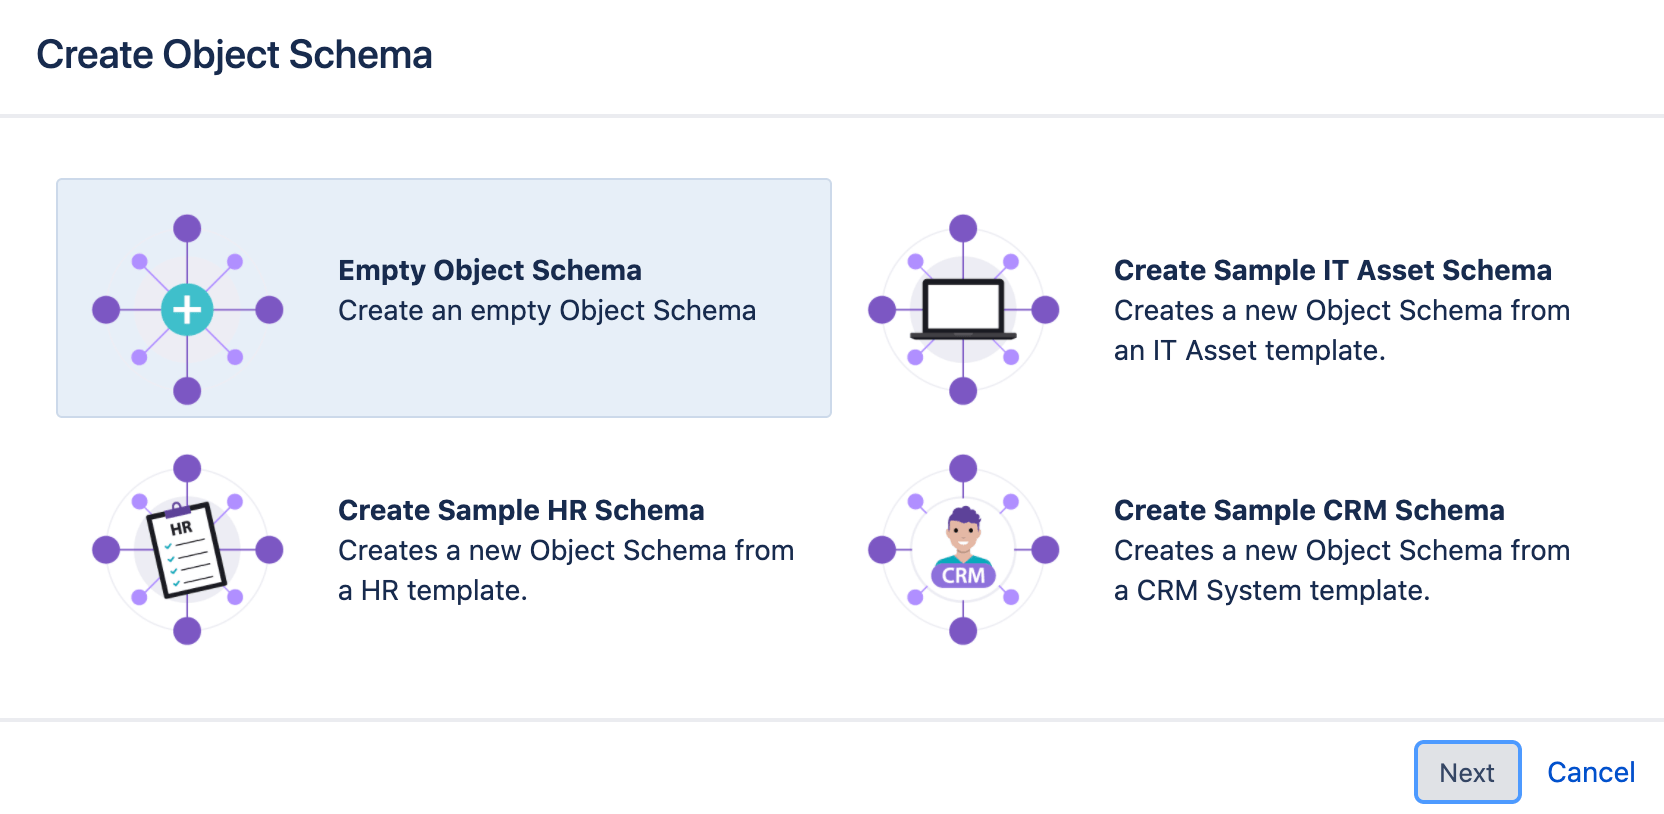
Assets comes with object schema templates for IT asset and configuration management, human resources, and customer relationships management.
These templates can be modified to suit your needs, but they’re a good starting point to the types of objects people often store in Assets. Go down the list of object types and remove any you won’t use.
Tips & Tricks
Think about what you can live without
Think carefully about what you are trying to achieve and what information is needed to do so. Each object and its attributes should be useful.
You should sit down with your team and any stakeholders and ensure each attribute is being consumed by someone or something. If nobody has a specific use for it, then it gets binned. It can always be added later!
Do you really need to know the exact location of your servers? Or the manufacturer of your operating systems? Maybe you do, and that's perfectly valid. But if you’re not going to make a decision or query based on that data, then into the scrap pile it should go!
Adding too much data has its challenges:
- The more objects and attributes you have, the more work is needed to keep them accurate.
- Lots of unused data will obscure the valuable data and could even degrade performance in extreme cases.
- It is easier to add data later than remove it. So if you discover you’re missing something, add it in later rather than starting off with loads of data ‘just in case.' Nobody likes deleting data.
Consider future maintainability
Consider how you will maintain the data when it’s in Assets. How often does an object’s attribute(s) change and how easy will it be to keep it up to date in Assets?
If a particular detail of an object changes often but it's rarely used, it probably makes more sense to keep it out of Assets and just look it up on the few occasions it’s actually needed. If something is used every now and then but is very static, then it may be worth including for ease of access.
Let’s take laptop software as an example. You could, if you wanted, update Assets to include every piece of software installed on the laptop using a scanning agent, software request issues, and automation rules. If you have an open installation policy then this is going to change relatively quickly and scanning patterns may not pick up new pieces of software so the accuracy might be a bit off. Instead, it’s probably better to look at a key set of software that you’re particularly interested in understanding the usage of.
If you have strict installation policies and software only gets installed at laptop setup and through service desk requests, then it may make sense to store it all in Assets as the rate of change is slower and it’s easier to track.
Think beyond physical items
As Assets let you define the objects you need, you aren’t limited to traditional or even physical assets. Business services, for example, are not physical assets but they’re often critical for people to understand in detail. You can link all of a service’s physical and non-physical dependencies to it so just by looking at a business service object, you can get a full understanding of how it’s running.
You can go as abstract as you’d like. Common examples of Assets users create include objects of business importance, environment types, departments/teams, locations, etc.
Another real-world example is categorizing business services. Let us say all your business services are added to Assets under the object type “Business Services.” You may want to categorize those business services into “Finance,” “Logistics,” “Sales,” “Infrastructure,” etc. You could do this with an attribute in the Business Service object type or you can make these categories their own object type called “Service Category.”
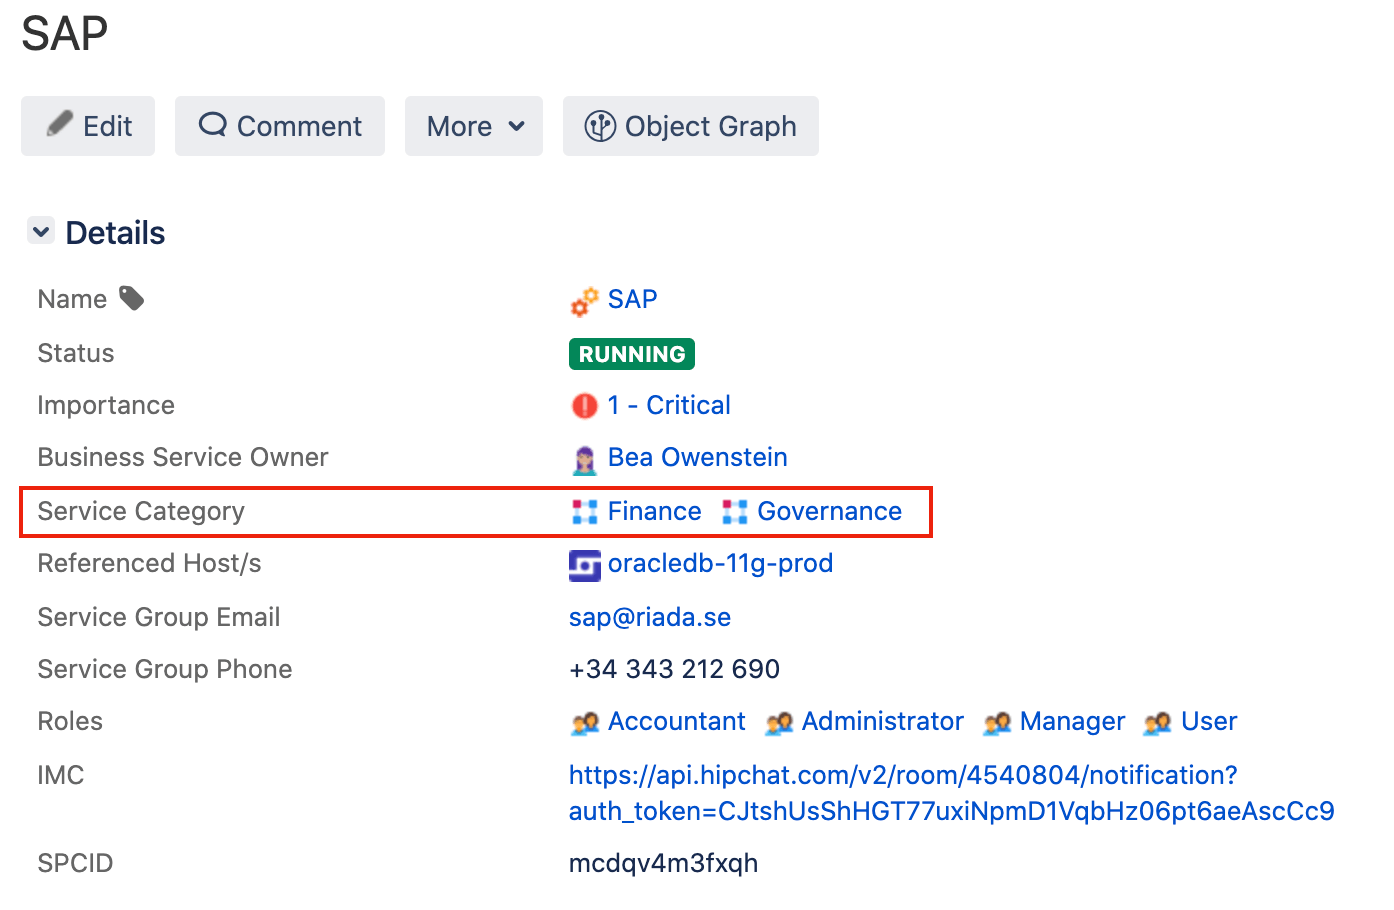
The benefit of this is that you can add details (attributes) specific to the business service category. Maybe there’s someone responsible for all finance business services. You don’t want to add that person directly to every finance “Business Service” object as it will become harder to maintain. Instead, you just add it once to the “Finance” object in the “Service Category” object type and now you only need to update it in one place and don't have to repeat data.
You can also have rules that take the operation status of each individual finance business service and roll them up into an overall status for the finance category. Now you can quickly see if there are any service problems with each category of service by viewing the category objects.
You don’t need to add these types of objects to Assets but it’s important to know that you’re not limited by traditional assets/configuration items. It all depends on what you want to do which is why understanding your goals and the information you need to achieve them is so key.
Look ahead and grow gradually
Keep in mind any extensions you may want to do in future. This will both shape what data you choose to include, but also how you structure your data.
While it’s good to keep it in mind, we do recommend building Assets up in a gradual way. Trying to do one huge big release with 100% accurate data for 1000s of objects is very tough. Starting small and adding new attributes, objects, and object schemas as you go is going to be significantly simpler.
Our recommendation is to find a problem, build up Assets to fix it, then move onto the next problem, growing Assets as you go.
Set realistic expectations for accuracy
100% accuracy at all times should be the goal but in reality, that may not be possible and that’s okay. As long as the data is sufficiently accurate enough to offer more business value than not having it in the first place, then you’re in a net positive. Many CMDB projects can be delayed or even fail as they’re waiting to be ‘perfect’ before go-live.
Step 4 - Get your data into Assets
Entering everything manually could be a life’s work in a large organization. So that’s why there are a few tools to help.
Assets Discovery Network Scanner
Assets Discovery is available for free from the marketplace.
Assets Discovery is an agentless scanner (although there is an agent available to get more detailed information) that picks up network assets. You can choose which assets and attributes you pull into your Assets object schemas as well as create your own scanning patterns to find more niche assets. If you run it on a schedule, it will pick up changes and keep data updated. With automation rules, you can even trigger Jira issues, email notifications, and more based on detected changes.
Importers
You can use Assets imports to bring in data from other sources. These import rules can be synchronized on a schedule so you can update your data when required. For each import type, you need to define where the data is stored and where it needs to go in Assets.
CSV import
If you're using a spreadsheet like Excel or Sheets that contains all your assets, you can use the CSV import to bring your data in Assets. This will ensure that you have an integrated and transparent system where you can link your assets to issues and analyze impact.
Database import
You can import data from an internal or third-party system with the database import. Supported databases include Oracle, MySQL, Microsoft SQL Server, and PostgreSQL.
Jira Users import
Oftentimes, users of Assets will link Jira users with the assets they own. For this, you need to import your Jira users or specific user groups in Assets which you can do with the Jira Users import.
LDAP import
Maybe you work with a corporate directory that contains your assets or employee-manager relationships used for approval processes? To make things easy, Assets has modules that works with popular LDAP directories, which fetch the structure and the assets from your directory.
JSON import
You can import objects into Assets with a JSON file that holds the data to import.
Integrations
Integrations can be used to connect to other tools such as cloud services, asset managers, and other CMDBs.
While we have all these tools, we don’t recommend you bring in every bit of data you have into Assets unless you plan to depreciate the tool. Bring in what you need to use in Jira Service Management - you can always bring in more later.
All integrations can be installed through the Marketplace for free.
Here is the full list of Assets integrations:
- Assets - AWS Integration
- Assets - Azure Integration
- Assets - Google Cloud Integration
- Assets - SCCM Integration
- Assets - Snow Integration
- Assets - ServiceNow Integration
- Assets - JAMF Integration
- Assets - Device42 Integration
- Assets - National Vulnerabilities Database Integration
- Assets - Jira & BitBucket Integration
- Assets - Tempo Integration
There is also the Assets - Confluence Integration. This integration allows you to make Confluence pages that document your assets. It sends out data rather than bringing in data to Assets.
Tips & Tricks
You do need to find a balance on how often you should run Assets Discovery, importers, and integrations. Too infrequently and Assets will be long out of date. Too frequently and it could consume a lot of resources depending how many objects you’re dealing with. Some users run integrations every hour, others may run once a week or even on demand.
We recommend synchronizing as often as you can during quiet times. Take a look at how often you think data will change and the importance of that data to determine how often you need to schedule it to run. You want to stay just ahead of how fast the data is changing.
With Assets Discovery, you can have different scanning patterns run at different frequencies to lower the resources required to keep Assets as up to date as possible.
Step 5 - Decide how to structure your data
Split data into logical object schemas
All of your data doesn’t need to go into one huge object schema. We recommend having multiple object schemas based on the use of the data or the owner(s) of the data.
Assets and Jira don’t care which object schemas contain what data. The admin just points an Assets custom field at the data it needs, whatever schema it’s in. And custom fields can pull and push data into multiple object schemas from one Jira issue. Links between objects in one object schema can be made with those in another and queries can be run across different schemas. Object schemas are mainly there to make our lives easier rather than for Assets itself.
Breaking your data down into different object schemas is both user friendly and easier to maintain. Teams such as finance or HR departments who may need some information from Assets, don’t need to be bombarded with information they don’t care about. It’s also easier to ask one team to do a regular check of data quality on one object schema, than it is to ask them to check only certain parts of one large object schema.
Federate your data
If you have a perfectly usable database or source of information somewhere and there are processes already in place to keep it updated, the data doesn’t need to be moved into Assets. Instead, it’s likely better to create a copy of the relevant data using integrations and have those integrations run on a schedule to update the Assets information.
Assets come with a number of importers and integrations (see above). With these importers and integrations, the information you need to make decisions can be made available in a Jira issue/Assets itself, but you’re not maintaining two separate copies.
A really common example we see of this is people using the LDAP importer to sync Assets with the Active Directory. Now you have all of your Windows users easily available and you can run the sync periodically to keep it updated.
Sometimes people will create separate object schemas for this imported data, other times people integrate them into bigger object schemas. If the data is going to be used for different uses (e.g. IT support and HR), then it makes more sense to have it as a separate object schema rather than tying it directly in with your IT object schema and then having to give HR access to that schema too.
With the integrations, we recommend not bringing every bit of data available into Assets. You can decide what does and doesn’t make it into the object schema when setting up the integration. You also shouldn’t update this data within Assets itself unless you also push that change to the original source of data. Otherwise, you’re going to end up with conflicting data.
If there’s not a pre-built integration available then you have some other options. The first is to export the data as a CSV/JSON file periodically and have the Assets CSV/JSON importers bring them in on a schedule. Alternatively, you could create an object and give it a URL attribute that links to the other database where more information can be found. This option is good if you just want agents to be able to view the information and don’t want to search or report based on it.
Avoid reusing the same attributes everywhere
If an attribute is used in many places and has the same repeated values then oftentimes, it makes more sense to make it its own object type. Vendor is a good example of this. For example, you could have an attribute called "Vendor" for the object types laptop and phone and then type (or import) the vendor name for each object.
This is fine, but it’s more efficient to have an object type called “Vendors” and set each vendor as an object for a number of reasons:
- You may want more than just the vendor name. Maybe you want other information related to the vendor such as support contact number or links to contracts. You don’t want to have to repeat this for every laptop and every phone. Just have it once and link to the vendor object. This also helps if you want to do elements of vendor management within Jira Service Management.
- The vendor will be standardized this way meaning reports are easier to run. If you wanted to report on the number of support requests per vendor, you can be confident you’re not missing something because someone wrote Micrsoft or Aple somewhere.
- If the vendor rebrands or needs to be changed in some way, then you only need to update it in one place.
Vendor is just one example but others include business importance levels, deployment environments, departments and locations.
Step 6 - Configure Assets custom fields for your Jira Issues
This section explains how you can configure Jira issues to link them with Assets objects. This could be linking the affected business service to your incident issues, adding a computer to a hardware request issue, or adding a set of potentially affected hosts to a change request issue.
Assets give you access to new, specific custom fields. These custom fields need to be configured to point at a particular set of objects.
Assets fields can be locked down so the customer can only choose from the available list or leave it blank. Or they can be left open so anyone filling out the Jira issue can add new objects into Assets directly from the form.
We recommend mainly using the first option but the second option has its use case. For example, in situations like onboarding a new employee. If you store your employees in Assets then you can have the hiring manager fill in an onboarding Jira request with open Assets custom fields. This will automatically create a new Assets employee object in the background which saves time and admin work.
Step 7 - Set up automations
This section takes a look at the two options you have for automating repetitive tasks in Assets.
Assets automations
Assets automations are specific to each object schema. Common uses include:
- Sending notifications based on certain triggers or changes with the Assets objects in the schema - e.g. sending an email when a license or warranty is due to expire, or creating a Jira issue if a service goes down.
- Keeping Assets data tidy and standardized for easy reporting and querying.
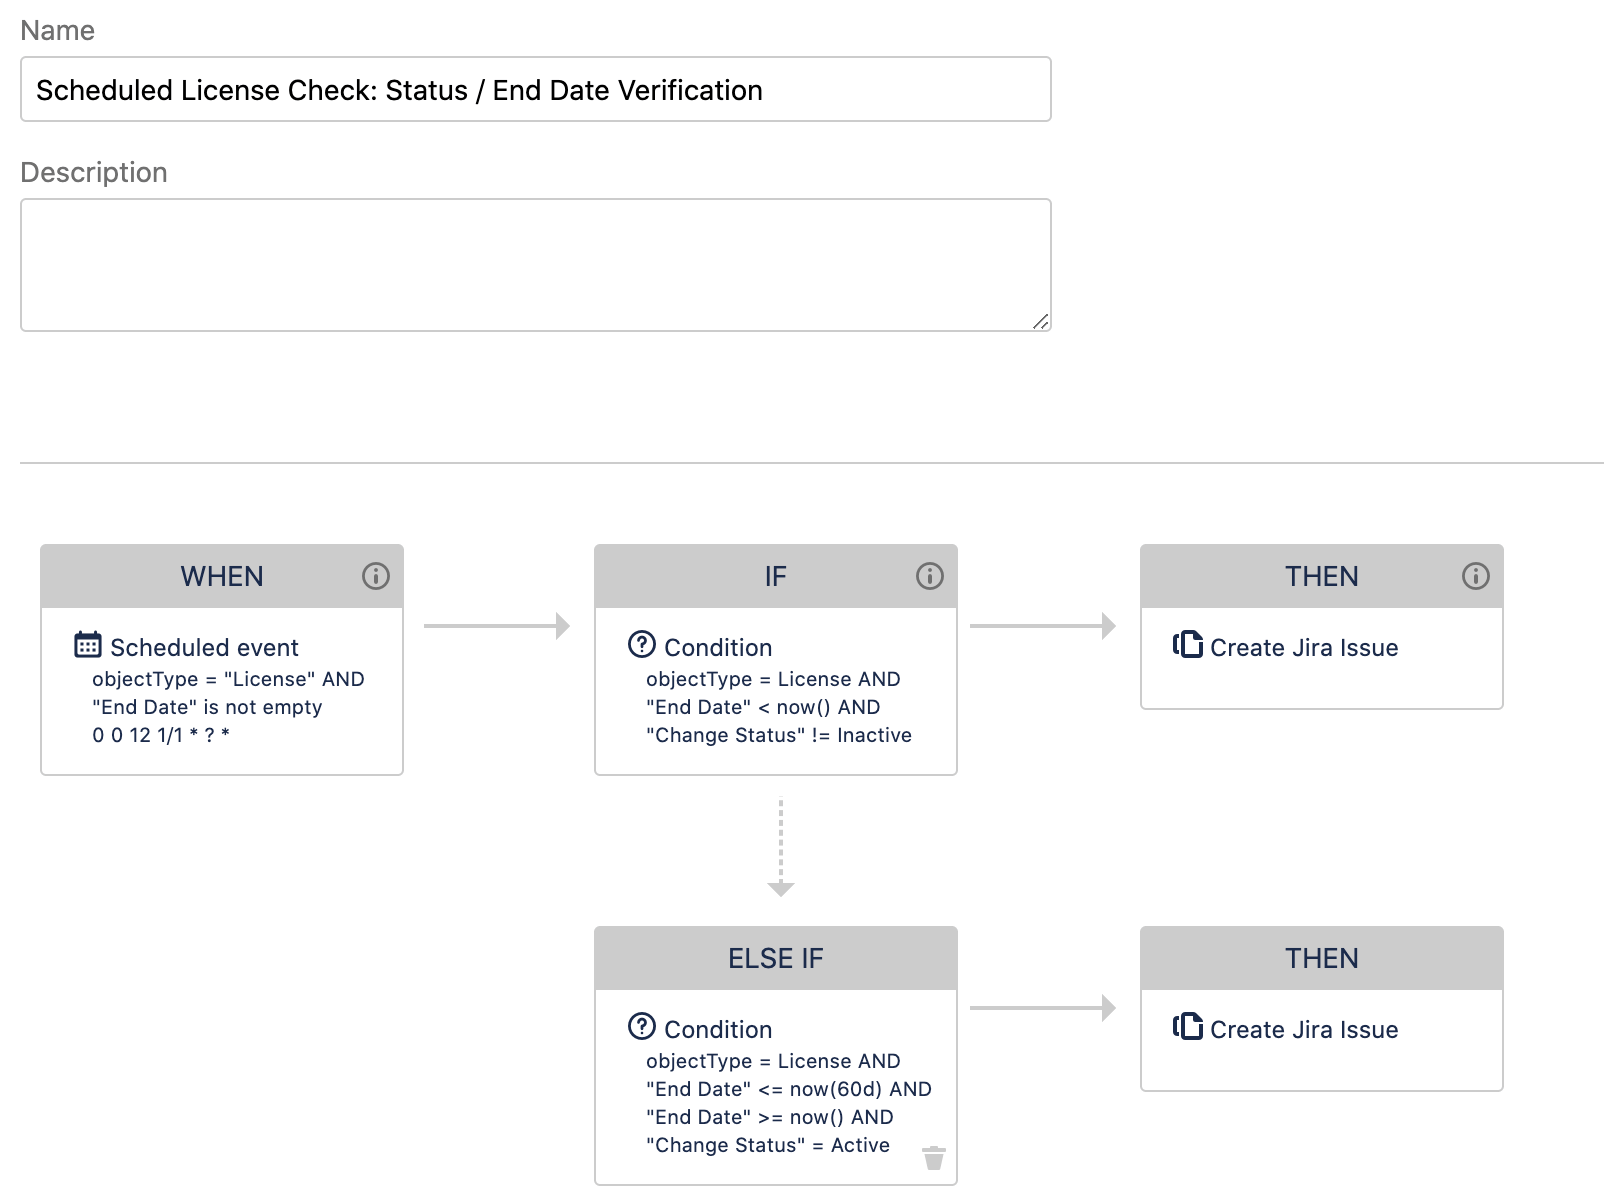
Automation rules can update object information, create issues, send emails, make HTTP requests, execute Groovy scripts, and more.
You can see how to create automation rules here:
Post functions
Assets also introduces new post functions. Similarly to automation rules, post functions allow you to automate the execution of actions.
The difference is that the actions take place when the status of an issue changes through a Jira workflow (issue transition). These actions include updating an asset, sending a notification, and running a script.
For instance, when an issue is created requesting the onboarding of an employee, tasks can be created to assign the necessary assets to the new user including laptop, cell phone, and cell phone subscription with linked Assets objects for each.
Tips & Tricks
If you are using issue text fields to enter or update data in Assets, or if you enter objects into Assets manually on occasion, there may be times when the data becomes a bit messy. In these cases, use automations.
Server names are a good example of this. Usually these will be standardized and might be easy to mistype. You can create automation rules that trigger when an object is created or updated of the type server to ensure the name meets the naming convention and flag it if it spots an error.
Step 8 - Decide how to keep your data accurate
Keeping your data up to date is critical, otherwise teams are going to be working under false assumptions which might delay incident resolutions or lead to the wrong outcome after a service request.
There are a number of ways to keep your data up to date in Assets, many of which rely on automations to do the heavy lifting.
- Perform regular audits of your data.
Assets automation rules can be set up to notify people to perform a data audit on a schedule. This gives them the reminder to do a quick sanity check to make sure key assets are up to date. - Synchronize Assets Discovery, and relevant importers and integrations regularly.
A big source of out of date data is not synchronizing Assets often enough with external sources of data. Think about how often data in your external source changes and how often it is used in Jira Service Management to get the balance correct. If something changes often and is linked to issues regularly, it may need to be synchronized every 24 hours. Other integrations may be able to wait weeks or even months. - Use automation rules.
When decisions are made in Jira issues that change asset/configuration data, it’s important to capture that in Assets. For example, if an agent decides to give a user a new laptop because the one they have is broken, there is information that needs to be captured in Assets:
- The new laptop needs its owner updated to the requestor and its status updated to “in service.”
- The old laptop needs its owner removed and its status updated to “broken.”
As the agent communicates this to the requestor, you can use transition screens and Assets post functions to capture this type of information and set the new statuses and owners in Assets using automation.
This is just one example, but as you build Assets into your Jira workflows, consider what information from the issue may need to be relayed back into Assets. Ideally, you want as little manual updating of Assets as possible as that’s something that is easy to forget to do.
Step 9 - Set up reporting
Reporting is very specific to you and your company and the problems you are trying to solve with Assets. Assets comes with a number of pre-configured reports to help you understand your assets and configuration data. You can report on your Assets objects, their related issues and projects, as well as the time spent on them.
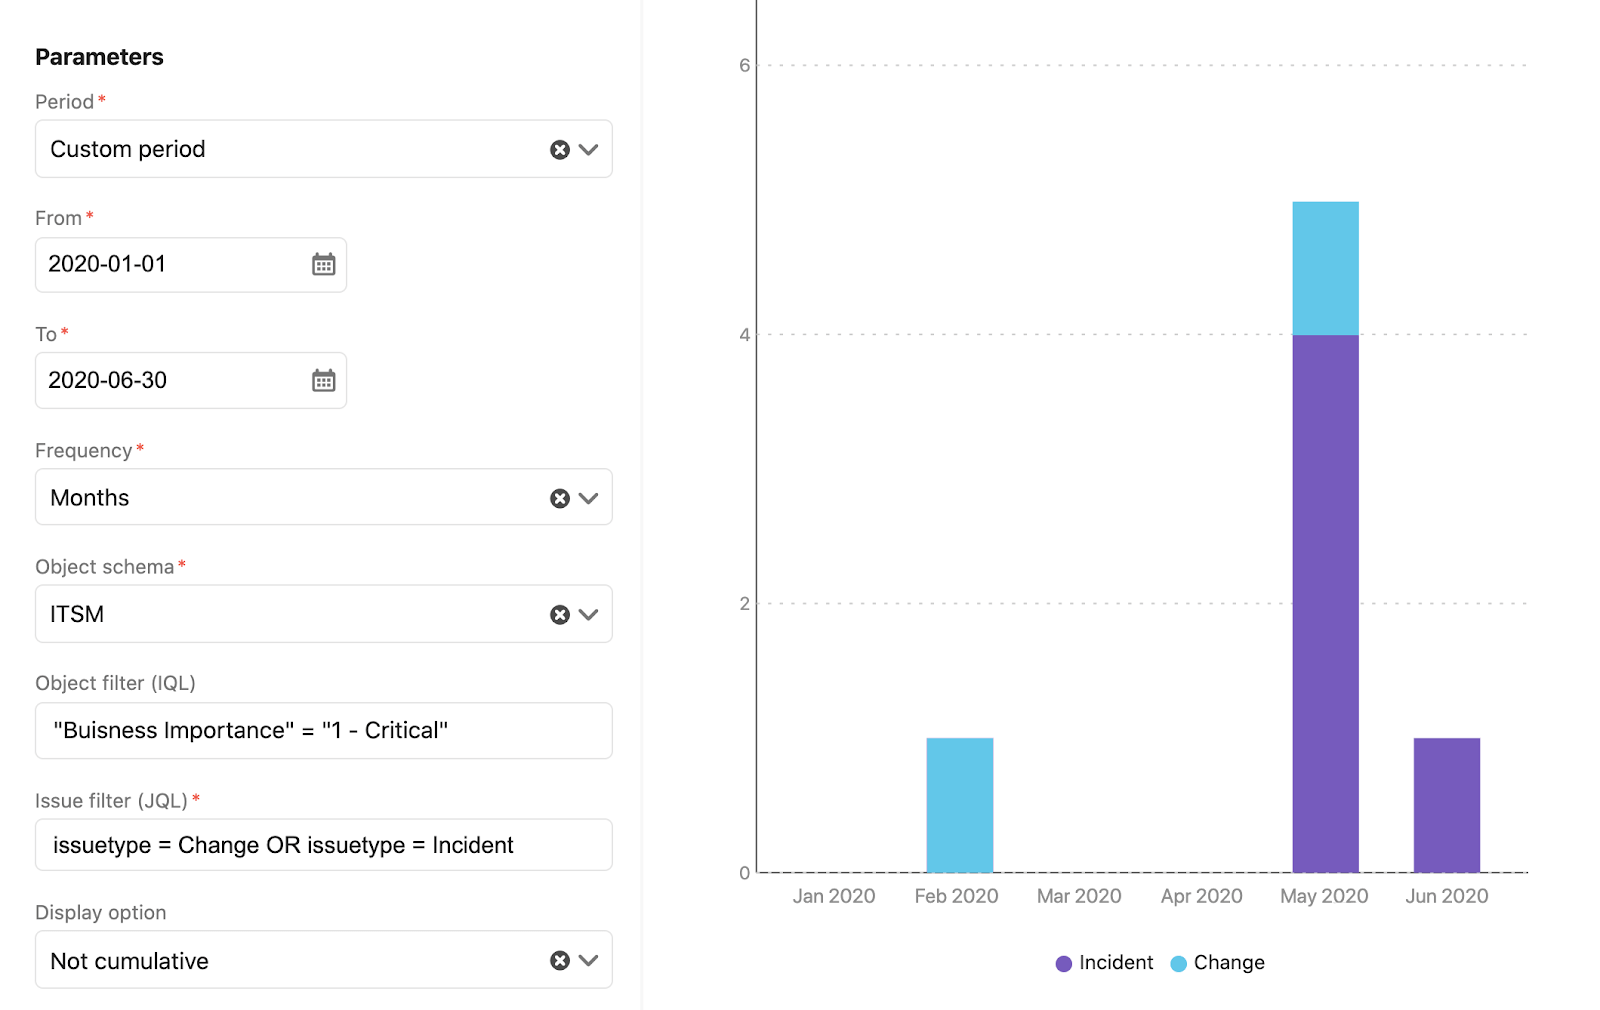
For example, you might want to understand how many changes and incidents have occurred with your critical business services, or if there is a pattern with the time spent on service requests and the types of assets they’re related to. You could use reports to see which critical business services have the highest number of linked incidents so you can understand where to prioritize any improvements.
Other topics
Assets Query Language - AQL
Assets Query Language (IQL) is the language used to query Assets. AQL comes in handy when you want to build search views, automation rules, advanced references between assets, or even instruct imports.
Labels & QR codes
Using labels and QR codes can really streamline the management of tangible assets. For this, Assets lets you print labels and QR Codes for any object.