Share
In SVN, developers share contributions by committing changes from a working copy on their local computer to a central repository. Then, other developers pull these updates from the central repo into their own local working copies.
Git’s collaboration workflow is much different. Instead of differentiating between working copies and the central repository, Git gives each developer their own local copy of the entire repository. Changes are committed to this local repository instead of a central one. To share updates with other developers, you need to push these local changes to a public Git repository on a server. Then, the other developers can pull your new commits from the public repo into their own local repositories.
Giving each developer their own complete repository is the heart of distributed version control, and it opens up a wide array of potential workflows. You can read more about these workflows from our Git Workflows section.
So far, you’ve only been working with a local Git repository. This page explains how to push this local repo to a public repository hosted on Bitbucket. Sharing the Git repository during the migration allows your team to experiment with Git commands without affecting their active SVN development. Until you’re ready to make the switch, it’s very important to treat the shared Git repositories as read-only. All development should continue to be committed to the original SVN repository.
Create a Bitbucket account
If you don’t already have a Bitbucket account, you’ll need to create one. Hosting is free for up to 5 users, so you can start experimenting with new Git workflows right away.
Create a Bitbucket repository
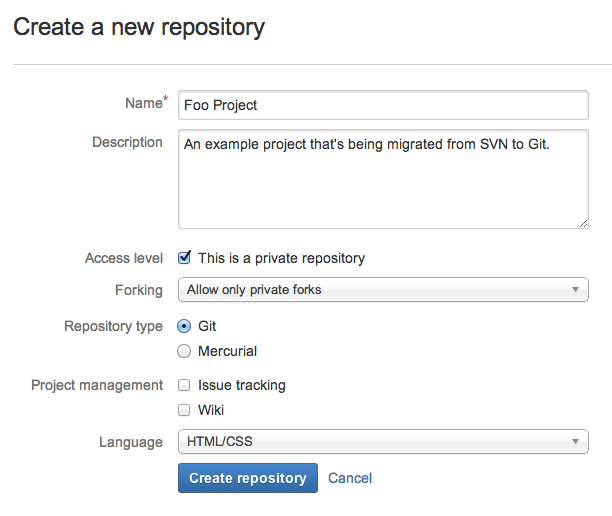
Next, you’ll need to create a Bitbucket repository. Bitbucket makes it very easy to administer your hosted repositories via a web interface. All you have to do is click the Create repository button after you’ve logged in.

In the resulting form, add a name and description for your repository. If your project is private, keep the Access level option checked so that only designated developers are allowed to clone it. For the Forking field, use Allow only private forks. Use Git for the Repository type, select any project management tools you want to use, and select the primary programming language of your project in the Language field.


related material
How to move a full Git repository
SEE SOLUTION
Learn Git with Bitbucket Cloud
To create the hosted repository, submit the form by clicking the Create repository button. After your repository is set up, you’ll see a Next steps page that describes some useful commands for importing an existing project. The rest of this page will walk you through those instructions step-by-step.
Add an origin remote
To make it easier to push commits from your local Git repository to the Bitbucket repository you just created, you should record the Bitbucket repo’s URL in a remote. A remote is just a convenient shortcut for a URL. Technically, you can use anything you like for the shortcut, but if the remote repository serves as the official codebase for the project, it’s conventionally referred to as origin. Run the following in your local Git repository to add your new Bitbucket repository as the origin remote.
git remote add origin https://<username>@bitbucket.org/<workspace-id>/<repo>.gitBe sure to change <username> to your Bitbucket username, <workspace-id> to your workspace’s id, and <repo> to the name of the Bitbucket repository. You should also be able to copy and paste the complete URL from the Bitbucket web interface.
After running the above command, you can use origin in other Git commands to refer to your Bitbucket repository.
Push the local repository to Bitbucket
Next, you need to populate your Bitbucket repository with the contents of your local Git repository. This is called “pushing,” and can be accomplished with the following command:
git push -u origin --allThe -u option tells Git to track the upstream branches. This enables Git to tell you if the remote repo’s commit history is ahead or behind your local ones. The --all option pushes all of the local branches to the remote repository.
You also need to push your local tags to the Bitbucket repository with the --tags option:
git push --tagsYour Bitbucket repository is now essentially a clone of your local repository. In the Bitbucket web interface, you should be able to explore the entire commit history of all of your branches.
Share the repository with your team
All you have to do now is share the URL of your Bitbucket repository with any other developers that need access to the repository. The URL for any Git repository can be copy-and-pasted from the repository home page on Bitbucket:

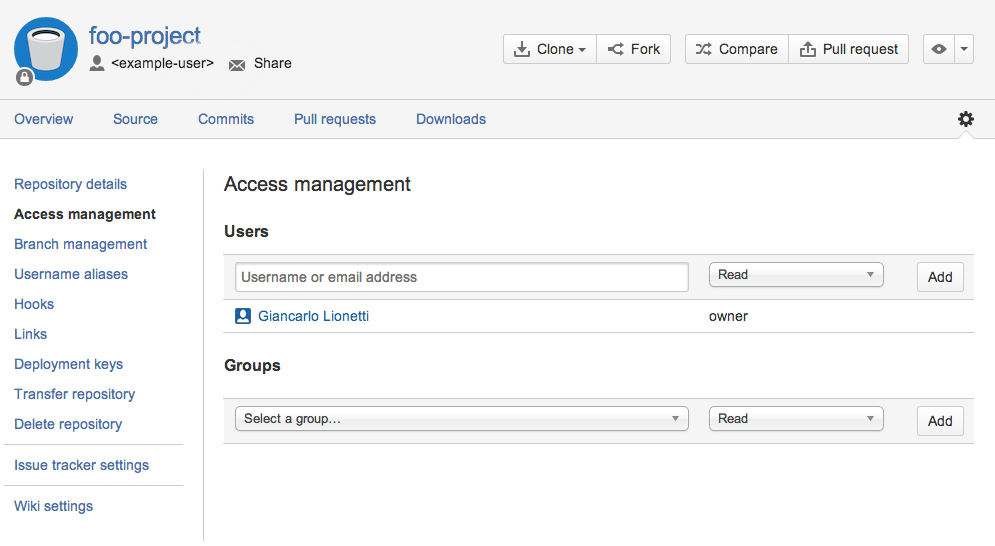
If your repository is private, you’ll also need to grant access to your team members in the Administration tab of the Bitbucket web interface. Users and groups can be managed by clicking the Access management link the left sidebar.

As an alternative, you can use Bitbucket’s built-in invitation feature to invite other developers to fork the repository. The invited users will automatically be given access to the repository, so you don’t need to worry about granting permissions.
Once they have the URL of your repository, another developer can copy the repository to their local machine with git clone and begin working with the project. For example, after running the following command on their local machine, another developer would find a new Git repository containing the project in the directory named <repo>.
git clone https://<username>@bitbucket.org/<workspace-id>/<repo>.git Continue committing with SVN, not Git
You should now be able to push your local project to a remote repository, and your team should be able to use that remote repository to clone the project onto their local machines. These are all the tools you need to start collaborating with Git. However, you and your team should continue to commit changes using SVN until everybody is ready to make the switch.
The only changes to the Git repository should come from the original SVN repository using the synchronization process discussed on the previous page. For all intents and purposes, this means that all of your Git repositories (both local and remote) are read-only. Your developers can experiment with them, and you can begin to integrate them into your build process, but you should avoid committing any permanent changes using Git.
Summary
In this step, you set up a Bitbucket repository to share your converted Git repository with other developers. You should now have all the tools you need to implement any of the git workflows described in Git Workflows. You can continue synchronizing with the SVN repository and sharing the resulting Git commits via Bitbucket for as long as it takes to get your development team comfortable with Git. Then, you can complete the migration process by retiring your SVN repository.
Share this article
Next Topic
Recommended reading
Bookmark these resources to learn about types of DevOps teams, or for ongoing updates about DevOps at Atlassian.

Bitbucket blog

DevOps learning path
