Tutorial: Confluence Cloud und Jira gemeinsam nutzen
Schon einzeln sind Confluence und Jira zwei sehr mächtige Werkzeuge. Gemeinsam jedoch können sie die Art und Weise, wie Teams Projekte gemeinsam bearbeiten, Software erstellen und wichtige Entscheidungen treffen, grundlegend verändern. Es gibt viele Wege, Confluence und Jira zu verbinden. Hier zeigen wir dir, wie du anfangen kannst.

Confluence und Jira bieten eine Komplettlösung, mit der alle Arten von Teams ihre beste Arbeit leisten können. Teams können Jira nutzen, um ihre Projekte zu verwalten, und mit Confluence relevanten Kontext für ihre Tasks einbetten, sodass alle synchron bleiben und schneller Ergebnisse liefern können. Wenn Teams Confluence und Jira integrieren, arbeiten sie zusammen und gewährleisten ein solides Projektmanagement und eine effektive Dokumentenkollaboration.

Wenn du Confluence Data Center nutzt, findest du in dieser Dokumentation (auf Englisch) Informationen darüber, wie du Jira-Anwendungen und Confluence gemeinsam verwenden kannst.
Confluence und Jira verknüpfen
Jira ist eine großartige Hilfe für dein Team, um Projekte zu planen und deren Fortschritt zu überwachen. Confluence kann dabei als eine Art großer Container dienen, in dem ihr alle eure Ideen, Inhalte und Dateien sammelt, die ihr benötigt, um eure Vision zum Leben zu erwecken.
Wenn du zum Beispiel ein Jira-Projekt mit dem Confluence-Bereich verknüpfst, der die gesamte Projektdokumentation enthält, musst du keine Netzlaufwerke oder Ordner mehr verwalten. Was du auch suchst, du findest es sofort wieder. Schauen wir uns an, wie das alles funktioniert.
Einen Confluence-Bereich mit einem Jira-Projekt verbinden
Dies ist der erste Schritt zur gemeinsamen Verwendung von Confluence und Jira.
- Navigiere zu den Projektseiten in der linken Seitenleiste von Jira.
- Klicke auf Mit Confluence verbinden.
- Suche nach dem Confluence-Bereich, den du verbinden möchtest.
Hervorragend! Du kannst jetzt Seiten und Whiteboards innerhalb von Jira anzeigen, erstellen und bearbeiten.
Eine Jira-Verknüpfung zu einer Confluence-Seite hinzufügen
Verknüpfungen helfen dir, jederzeit einfach zwischen den Produkten zu wechseln.
- Kopiere die URL deines Jira-Projekts.
- Öffne den Confluence-Bereich, den du damit verknüpfen möchtest.
- Tippe in der linken Seitenleiste von Confluence auf + (Verknüpfung hinzufügen).
- Füge die URL deines Jira-Projekts in das Dialogfeld "Verknüpfungen für Bereich hinzufügen" ein und gib der Verknüpfung einen aussagekräftigen Namen.
Jetzt brauchst du nur noch auf die Verknüpfung in der linken Seitenleiste klicken und du gelangst sofort zu deinem Jira-Projekt. Jeder kann in jedem Bereich eine Verknüpfung zur Seitennavigation hinzufügen, und Administratoren können abgekürzte Links erstellen.
Eine Confluence-Verknüpfung zu einem Jira-Projekt hinzufügen
Admins können Jira-Projekten eine Confluence-Verknüpfung hinzufügen.
- Öffne die Confluence-Seite, die du mit Jira verknüpfen möchtest. Das wird wahrscheinlich deine Bereichsübersicht sein.
- Kopiere die Seiten-URL, indem du "Freigeben" auswählst.
- Wähle im Jira-Projekt deiner Wahl in der linken Seitenleiste Verknüpfung hinzufügen und dann "Verknüpfung" aus.
- Füge die URL der Confluence-Seite ein und gib der Verknüpfung einen Namen, genauso wie du es bereits in Confluence gemacht hast.
Jetzt kannst du jederzeit zum verknüpften Confluence-Bereich und zurück wechseln. Die Verknüpfung eines Jira-Projekts mit einer Confluence-Seite hat noch einen weiteren Effekt, denn alle wichtigen Jira-Benachrichtigungen, wie Freigaben, Erwähnungen und Kommentare, werden jetzt auch in den Confluence-Benachrichtigungen angezeigt. So entgeht dir nie wieder eine wichtige Jira-Benachrichtigung, selbst wenn du bis zum Hals in Confluence-Arbeit steckst.
Schau dir dieses Video mit einer Schritt-für-Schritt-Anleitung an:
Confluence in Jira verwenden
Wenn du dein Jira-Projekt mit einem Confluence-Bereich verknüpft hast, kannst du Confluence-Seiten anzeigen, bearbeiten und erstellen, ohne das Produkt zu verlassen. So vermeidest du Kontextwechsel und dank der Integration erhöhst du die Benutzerfreundlichkeit deiner Jira-Projektseiten.
Das Anzeigen von Seiten ist einfach. Navigiere zu deinen Projektseiten und wähle eine Seite aus, um sie in einem eingebetteten Fenster zu öffnen. So musst du nicht zu Confluence wechseln.
Um neue Inhalte aus dem Projektseitenbereich hinzuzufügen, kannst du entweder eine leere Confluence-Seite oder eine Confluence-Vorlage verwenden – alles von Jira Software aus.
Wenn du Confluence-Seiten bearbeiten möchtest, ist das dank in Jira eingebetteter Seiten ebenfalls problemlos möglich. Gehe einfach zum Projektseitenbereich und bewege den Mauszeiger über eine Seite. Ein Stiftsymbol wird angezeigt und mit einem Klick kannst du mit dem Bearbeiten beginnen.
Wenn du dein Jira-Projekt mit einem Confluence-Bereich verknüpft hast, kannst du Confluence-Seiten und -Whiteboards anzeigen, bearbeiten und erstellen, ohne Jira zu verlassen. Dadurch entfällt der Kontextwechsel und es entsteht ein stärker integriertes Erlebnis.
Seiten von Jira Project-Seiten aus ansehen, erstellen und bearbeiten
Die Verwaltung von Confluence-Seiten und Whiteboards ist innerhalb von Jira nahtlos. Im Bereich "Projektseiten" kannst du eine Seite ansehen, indem du sie auswählst. Sie wird dann in einem eingebetteten Fenster geöffnet – du musst also nicht zwischen Tools wechseln.
Das Erstellen neuer Inhalte ist genauso einfach: Beginne mit einer leeren Confluence-Seite oder verwende eine Vorlage, alles direkt in Jira zugänglich. Auch die Bearbeitung ist intuitiv – bewege den Mauszeiger über eine eingebettete Seite, klicke auf das Stiftsymbol und nimm deine Änderungen vor, ohne Jira zu verlassen.
Durch diese optimierte Integration kannst du Inhalte effizient ansehen, erstellen und bearbeiten , alles an einem Ort.

Confluence-Seiten und -Whiteboards direkt zu Jira-Vorgängen hinzufügen
Verleihe Tasks wichtigen Kontext, indem du Dokumentation oder Informationen direkt in Jira-Vorgängen hinzufügst. Dazu kannst du Links zu Seiten und Whiteboards zu deinen Jira-Vorgängen oder Links zu deinen Jira-Vorgängen zu Confluence-Seiten hinzufügen.
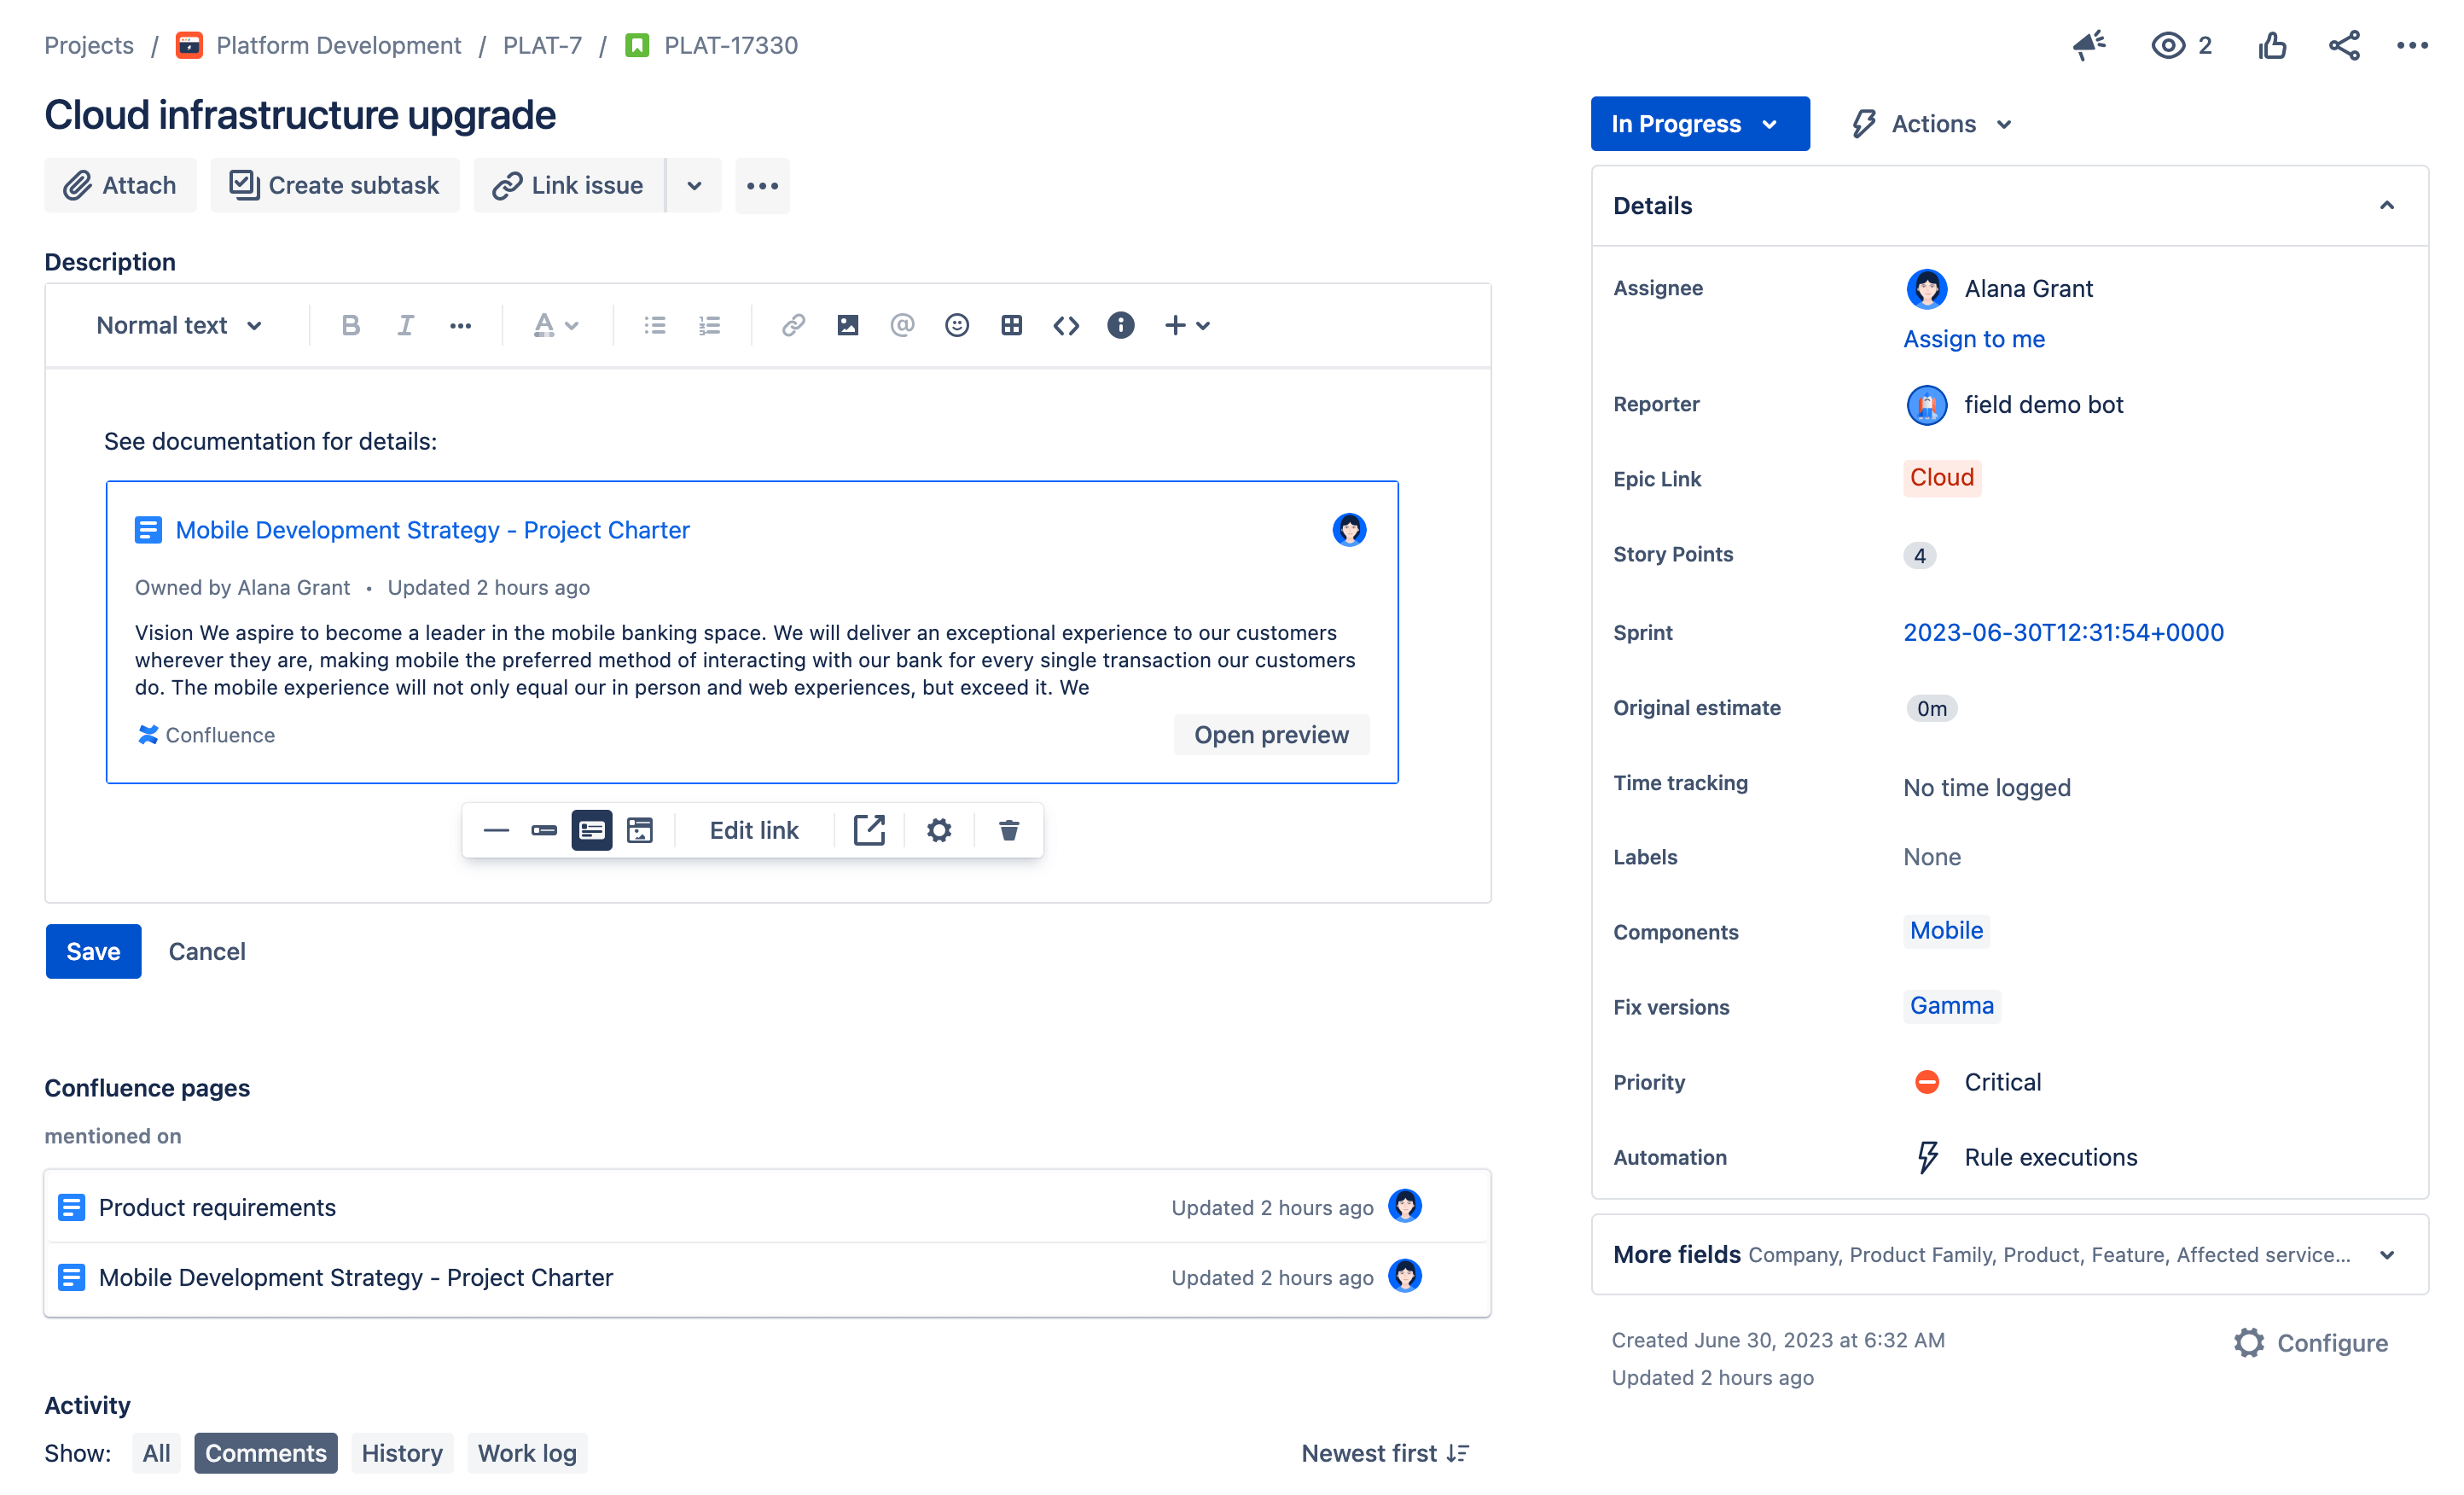
Confluence-Inhalte direkt zu Jira-Vorgängen hinzufügen
Schaltfläche "+ Hinzufügen"
Über die Schaltfläche "+ Hinzufügen" kannst du entweder zu bestehenden Confluence-Inhalten verlinken, eine neue Confluence-Seite erstellen oder ein Confluence-Whiteboard aus einem Drop-down-Menü erstellen.
Link zu Confluence-Inhalten
Du kannst bestehende Confluence-Seiten ganz einfach mit deinen Jira-Vorgängen verknüpfen, um wichtige Dokumentation, Besprechungsnotizen oder Projektpläne immer griffbereit zu haben.
- Öffne den Jira-Vorgang, zu dem du Confluence-Inhalte hinzufügen möchtest.
- Wähle die Schaltfläche "+ Hinzufügen" und dann "Bestehende Confluence-Seite" aus.
- Ein neuer Abschnitt mit dem Titel "Confluence-Inhalt" wird angezeigt. Du kannst Confluence-Inhalte verlinken, indem du nach einer Seite suchst oder den Link einfügst. Du kannst auch nach Bereichen filtern.
- Ein Link zu deiner ausgewählten Confluence-Seite wird erstellt und zeigt den Seitentitel, den Aktualisierungsstatus und wer ihn zuletzt aktualisiert hat.
Eine Confluence-Seite erstellen
Manchmal musst du möglicherweise direkt in Jira eine neue Confluence-Seite erstellen, um eine Task zu dokumentieren oder zusätzliche Ressourcen zu teilen.
- Öffne den Jira-Vorgang, in dem du eine neue Confluence-Seite erstellen möchtest.
- Öffne das Drop-down-Menü neben der Schaltfläche "+ Hinzufügen Erstellen und wähle "Neue Confluence-Seite" aus.
- Eine neue Confluence-Seite wird erstellt und automatisch mit dem Jira-Vorgang verknüpft.
- Du kannst jetzt die neue Confluence-Seite in Jira bearbeiten und relevante Informationen hinzufügen.
- Der Link zu deiner neuen Confluence-Seite wird in deinem Jira-Vorgang unter "Confluence-Inhalt" erscheinen.
Ein Confluence-Whiteboard erstellen
Confluence-Whiteboards bieten einen Raum für Brainstorming und Zusammenarbeit, der direkt mit Jira-Vorgängen verknüpft ist.
- Öffne den Jira-Vorgang, in dem du ein neues Confluence-Whiteboard erstellen möchtest.
- Öffne das Drop-down-Menü neben der Schaltfläche "+ Hinzufügen" und wähle "Neues Confluence-Whiteboard" aus.
- Ein neues Confluence-Whiteboard wird erstellt und automatisch mit dem Jira-Vorgang verknüpft.
- Du kannst jetzt das neue Confluence-Whiteboard in Jira bearbeiten und relevante Informationen hinzufügen.
- Der Link zu deinem neuen Confluence-Whiteboard wird in deinem Jira-Vorgang unter "Confluence-Inhalt" erscheinen.
Intelligente Links
Wenn du Confluence-Inhalt-URLs kopierst und in eine Beschreibung eines Jira-Vorgangs einfügst, erscheint ein intelligenter Link. Intelligente Confluence-Links geben wichtigen Kontext zur Seite direkt im Jira-Vorgang. So fügst du intelligente Links hinzu:
- Kopiere die Seiten-URL in der Adressleiste des Browsers oder indem du Teilen und Link kopieren auswählst.
- Füge die URL in die Beschreibung der Jira-Vorgangsansicht ein.
- Ein intelligenter Confluence-Link wird angezeigt. Um die Ebene des sichtbaren Kontexts zu ändern, klicke in die Beschreibung, bewege den Mauszeiger über den intelligenten Link und wähle Konfigurieren aus. Wähle dann URL, Inline, Karte oder Einbetten aus.
- Wähle Speichern, um deine Jira-Vorgangsbeschreibung zu speichern.
Außerdem werden URLs zu Jira-Vorgängen, die in Confluence-Seiten eingefügt werden, im Abschnitt "Confluence-Seiten" eines Jira-Vorgangs angezeigt, sodass du relevante Dokumente leicht finden kannst, in denen der Vorgang erwähnt wird.
Jira-Vorgänge in Confluence erstellen
Du kannst Jira-Vorgänge direkt auf Confluence-Seiten erstellen, um die Task-Verwaltung zu optimieren und sicherzustellen, dass wichtige Aufgaben nachverfolgt werden. Je nach deiner Präferenz kannst du:
- einen einzelnen Vorgang erstellen (<- Hyperlink)
- mehrere Vorgänge erstellen (<- Hyperlink)
Innerhalb jedes Ansatzes gibt es mehrere Methoden, um dies zu erreichen. Im Folgenden findest du zwei Anleitungen, wie du entweder einen Jira-Vorgang oder mehrere Vorgänge gleichzeitig erstellst.
Einen einzelnen Jira-Vorgang erstellen
Einen Jira-Vorgang aus markiertem Text erstellen
- Öffne die Confluence-Seite mit dem Text, den du für den Jira-Vorgang verwenden möchtest.
- Markiere den Text oder Abschnitt, den du in einen Jira-Vorgang umwandeln möchtest.
- Sobald der Text hervorgehoben ist, erscheint eine kleine Werkzeugleiste über der Auswahl. Klicke auf die Schaltfläche "+ Jira-Vorgang".
- Es öffnet sich ein Dialogfeld, in dem du Details des Jira-Vorgangs angeben kannst, wie das Projekt, den Typ, die Zusammenfassung, die Beschreibung und alle anderen erforderlichen oder relevanten Felder. Der hervorgehobene Text wird automatisch in das Beschreibungsfeld eingefügt.
- Überprüfe die Details des Vorgangs und nimm alle notwendigen Anpassungen vor.
- Klicke auf Erstellen, um den Jira-Vorgang zu generieren. Der Vorgang wird in Jira erstellt und zur leichteren Bezugnahme wieder mit der Confluence-Seite verknüpft.
Mithilfe von Atlassian Intelligence (AI) einen Jira-Vorgang aus markiertem Text erstellen
- Öffne die Confluence-Seite mit dem Text, den du in einen Jira-Vorgang verwandeln möchtest.
- Markiere den entsprechenden Text oder Abschnitt.
- Es erscheint ein Kontextmenü mit der Option + Jira-Vorgang. Wenn du Confluence Premium+ oder Jira Premium+ und Atlassian Intelligence aktiviert hast, siehst du in diesem Menü einen zusätzlichen Schalter, mit dem du Atlassian Intelligence verwenden kannst, um eine Zusammenfassung und Beschreibung zu generieren. Schalte die Option ein.
- AI analysiert den hervorgehobenen Text, um basierend auf dem Inhalt eine Zusammenfassung und Beschreibung für deinen Jira-Vorgang vorzuschlagen. Er wird eine vorab ausgefüllte Zusammenfassung und Beschreibung des Vorgangs enthalten.
- Überprüfe die von AI generierten Details. Du kannst bei Bedarf Anpassungen vornehmen oder die Vorschläge von AI akzeptieren.
- Klicke auf Erstellen, um den Jira-Vorgang zu generieren. Der Vorgang wird in Jira mit den von AI bereitgestellten Details erstellt und zum einfachen Nachschlagen wieder mit der Confluence-Seite verlinkt.
Mit diesen Schritten kannst du Jira-Vorgänge effizient von Confluence-Seiten aus erstellen, entweder manuell oder mithilfe der erweiterten KI-Funktionen, die in Confluence Premium oder Jira Premium+ verfügbar sind.
Erstelle einen Jira-Vorgang im Confluence-Seiteneditor
Du kannst Jira-Aufgaben erstellen, während du in Confluence neue Inhalte entwirfst oder bestehende Inhalte bearbeitest. Wenn du im Bearbeitungsmodus bist, verwende das Makro „Jira-Vorgänge erstellen“, um Jira-Vorgänge zu erstellen, ohne Confluence zu verlassen.
- Tippe /createjiraissue ein, während du eine Seite bearbeitest, oder öffne das Drop-down-Menü in Elemente einfügen + und suche nach "Jira-Vorgang erstellen".
- Wähle im Drop-down-Menü Jira-Vorgang erstellen aus.
- Gib die Details des Vorgangs ein und wähle dann Erstellen aus.
- Der Vorgang wird automatisch zu dem von dir ausgewählten Jira-Projekt und deiner Confluence-Seite hinzugefügt.
Schau dir dieses Video mit einer Schritt-für-Schritt-Anleitung an:
Jira-Vorgänge zu Confluence hinzufügen
Wer springt schon gerne zwischen mehreren Anwendungen hin und her? Niemand. Deshalb kannst du deine Jira-Vorgänge auch direkt in Confluence überwachen. Ob du die meiste Zeit des Tages nun in Confluence oder in Jira verbringst, du behältst jederzeit den Überblick und hast volle Kontrolle, wodurch dein Team effizienter arbeiten kann.
Jira-Vorgänge direkt in Confluence verfolgen
Du kannst auf deiner Confluence-Seite eine dynamische Verknüpfung zu einem Jira-Vorgang erstellen, indem du den entsprechenden Link einfach auf die Confluence-Seite kopierst. Wenn du die Seite veröffentlichst, werden die ID und der Titel des Vorgangs, die Vorgangskategorie (Epic, Task usw.) und der Status des Vorgangs im Workflow (Aufgaben, In Arbeit, Fertig usw.) angezeigt.
Auf der Seite des Jira-Vorgangs wird im Abschnitt "Confluence-Seiten" eine Verknüpfung zur Confluence-Seite angezeigt.
Eine dynamische Liste mit Jira-Vorgängen auf einer Confluence-Seite anzeigen
Jira-Vorgänge auf ein Whiteboard importieren
Wenn du Jira-Vorgänge auf ein Confluence-Whiteboard importierst, kannst du deine Tasks und Projekte in einem kollaborativen Bereich visualisieren und verwalten. Mit diesen Schritten importierst du Jira-Vorgänge manuell:
- Öffne dein Confluence-Whiteboard, wo du einen Jira-Vorgang hinzufügen möchtest.
- Wähle in der unteren Symbolleiste Aus Jira importieren aus.
- Es erscheint ein Menü, in dem du nach dem Jira-Vorgang, den du importieren möchtest, filtern und suchen kannst.
- Wähle einen oder mehrere Vorgänge aus und klicke dann auf Importieren.
- Der Jira-Vorgang erscheint jetzt auf deinem Whiteboard. Du kannst auf den Vorgang klicken, um ihn in einem neuen Tab in Jira zu öffnen.
Gesamtes Whiteboard in einen Jira-Vorgang einbetten
Wenn du ein Confluence-Whiteboard in einen Jira-Vorgang einbettest, kannst du visuellen Kontext und Details zur Zusammenarbeit direkt in Jira bereitstellen. Mit diesen Schritten bettest du ein Confluence-Whiteboard ein:
- Kopiere die URL des Confluence-Whiteboards, das du in Jira einbetten möchtest. Oder wähle Teilen und Link kopieren aus.
- Öffne den Jira-Vorgang, in den du dein Confluence-Whiteboard importieren möchtest.
- Füge den Whiteboard-Link in die Beschreibung des JIRA-Vorgangs ein. Um die Ebene der sichtbaren Inhalte zu ändern, fahre mit der Maus über den Link und wähle Konfigurieren aus. Wähle dann URL, Inline, Karte oder Einbetten aus. Wenn du Einbetten auswählst, ist das Whiteboard in deinem Jira-Vorgang am besten sichtbar.
- Du kannst dein Whiteboard jetzt direkt von deinem Jira-Vorgang aus betrachten und mit ihm interagieren.
Eine dynamische Liste mit Jira-Vorgängen auf einer Confluence-Seite anzeigen
So zeigst du eine Liste mit Jira-Vorgängen auf einer Confluence-Seite an:
- Gib beim Bearbeiten einer Seite /jira ein oder tippe auf + und wähle Jira aus.
- Suche in der Suchleiste nach Jira-Vorgängen.
- Wähle die Vorgänge aus, die angezeigt werden sollen.
- (Optional) Mit den Anzeigeoptionen kannst du die Darstellung der Vorgänge anpassen.
- Wähle "Einfügen" aus.
Bei der Auswahl der Jira-Vorgänge für deine Seite kannst du nach vorhandenen Vorgängen suchen, neue Vorgänge erstellen oder aus den kürzlich angesehenen Vorgängen auswählen. Die Suchfunktion ist sehr leistungsfähig. Du kannst nach Vorgangsschlüssel, Such-URL, Jira-Verknüpfung, JQL, Text oder einem Filter suchen. Mit Filtern sparst du übrigens jede Menge Zeit – du kannst einen neuen Filter für eine Vorgangsgruppe erstellen oder Jira nach gespeicherten Filtern durchsuchen.
Jetzt kannst du auswählen, wie die Jira-Vorgänge auf deiner Seite dargestellt werden, zum Beispiel als Tabelle oder einfach nur die Anzahl der Vorgänge, die deine Suche ergibt. Die Tabelle ist dynamisch und wird mit deiner Confluence-Seite aktualisiert.
Schau dir dieses Video mit einer Schritt-für-Schritt-Anleitung an:
Den Jira-Vorgangssammler einbetten
Mit einem Jira-Vorgangssammler lässt sich die Erstellung von Tasks in Confluence noch weiter vereinfachen.
Der Vorgangssammler ermöglicht die Einbettung eines Jira-Formulars auf einer Confluence-Seite oder -Website. Nachdem du den Vorgangssammler konfiguriert und auf deiner Confluence-Seite platziert hast, wird dieser als Schaltfläche angezeigt. Wenn du auf diese Schaltfläche klickst, wird ein Formular geöffnet, mit dem du einen Jira-Vorgang erstellen kannst. Jeder, der Zugriff auf deine Confluence-Seite hat, kann die Schaltfläche nutzen, dein angepasstes Formular ausfüllen und ein neues Jira-Ticket für das Jira-Projekt erstellen, das in deinem Confluence-Bereich bzw. auf der Seite verknüpft ist.
Der Jira-Vorgangssammler ist zum Beispiel praktisch, um Feedback von Kunden einzuholen, es den Mitarbeitern in deinem Unternehmen zu ermöglichen, Probleme oder Bugs in den eigenen Produkten zu protokollieren, oder allen, die mit Confluence arbeiten, eine Möglichkeit zu bieten, Tickets in Jira zu erstellen, ohne den Workflow unterbrechen zu müssen.
Einen Jira-Vorgangssammler einrichten und einbetten (auf Englisch).
Jira-Roadmap in Confluence einbetten
Es gibt zwei einfache Möglichkeiten, eine Echtzeit-Roadmap einfach in deine Confluence-Seite einzubetten. So kannst du Informationen zu geplanten Projekten, Statusupdates und mehr teilen, damit dein Team immer auf dem neusten Stand ist. So findet ihr alles Wichtige an einem zentralen Ort und müsst weder die App wechseln noch manuell Inhalte kopieren und einfügen. Mithilfe dieser Methoden können auch erweiterte Roadmaps eingebettet werden, was zusätzliche Planungs- und Visualisierungsfunktionen bietet.
Eine Jira-Roadmap mit intelligenten Links einfügen
- Öffne die Confluence-Seite, auf der du die Jira-Roadmap hinzufügen möchtest.
- Klicke auf die Schaltfläche Bearbeiten, um den Seitenbearbeitungsmodus aufzurufen.
- Klicke in der Editor-Symbolleiste auf die Schaltfläche + (Einfügen).
- Wähle Jira Road Map aus dem Drop-down-Menü aus. Dadurch wird ein Jira-Integrationsdialog geöffnet.
- Wähle aus deinen verfügbaren Roadmaps oder Plänen in Jira aus.
- Klicke auf Einfügen, um die gewählte Roadmap zu deiner Confluence-Seite hinzuzufügen.
- Passe die Größe und Platzierung der eingebetteten Roadmap nach Bedarf an.
- Klicke auf Speichern oder Veröffentlichen, um die Änderungen an deiner Confluence-Seite abzuschließen.
Eine Jira-Roadmap mit Makros einfügen
- Gib beim Bearbeiten einer Seite /jira roadmap ein oder tippe auf + und wähle Jira Road Map aus.
- Füge eine Jira-Instanz-URL ein, wähle dein Projekt und Board aus und gehe dann auf Speichern.

Berichterstattung über Jira-Daten in Confluence
Es ist nicht immer einfach, alle Fortschritte, Ergebnisse und Entscheidungen im Auge zu behalten. Gerade wenn viele Stakeholder und Teams involviert sind, muss der Informationsaustausch möglichst effizient erfolgen. Mit den Jira-Berichten können sich Stakeholder mit nur wenigen Klicks einen Überblick über den Fortschritt deines Teams verschaffen. Wenn alle beteiligten Stakeholder im Bilde sind, kann sich dein Team besser auf seine Aufgaben konzentrieren und kommt schneller zum Ergebnis.
Jira-Inhalte mit intelligenten Links in Confluence einbetten
Intelligente Links bieten eine einfache Möglichkeit, mit minimalem Aufwand Jira-Inhalte in Confluence zu integrieren und anzusehen. Diese Funktion unterstützt das Einbetten der folgenden Jira-Inhaltstypen:
- Jira-Board
- Jira-Backlog
- Jira-Dashboards und Gadgets
- Jira-Releases
Schritte zum Einbetten von Jira-Inhalten mithilfe von intelligenten Links
- Öffne den spezifischen Jira-Inhalt (z. B. Board, Backlog, Dashboard, Gadget oder Release), den du einbetten möchtest.
- Kopiere die URL aus der Adressleiste deines Browsers.
- Navigiere zur Confluence-Seite, auf der du den Jira-Inhalt einbetten möchtest.
- Klicke auf die Schaltfläche Bearbeiten, um den Seitenbearbeitungsmodus aufzurufen.
- Platziere deinen Cursor an der gewünschten Stelle auf der Seite.
- Füge die kopierte URL direkt in die Confluence-Seite ein. Confluence erkennt die URL automatisch und zeigt sie als intelligenten Link an.
- Der intelligente Link rendert eine Vorschau der Jira-Inhalte. Du kannst auf die Vorschau klicken, um Einstellungen oder Anzeigeoptionen bei Bedarf anzupassen.
- Klicke auf Speichern oder Veröffentlichen, um das Hinzufügen der Jira-Inhalte zu deiner Confluence-Seite abzuschließen.
Jira-Berichtsvorlage verwenden, um Berichte zu erstellen
Die Jira-Berichtsvorlage vereinfacht die Berichterstellung zu den Aufgaben in deinen Jira-Projekten. Es ist eine einfache Möglichkeit, Fortschritte bei aktuellen Releases zu teilen oder ein statisches Änderungsprotokoll anzuzeigen, das angibt, was sich zwischen deinen letzten Releases geändert hat.
Schritte zur Verwendung der Jira-Berichtsvorlage:
- Erstelle zunächst eine Confluence-Seite mithilfe der Jira-Berichtsvorlage.
- Wähle das Jira-Projekt aus, über das du berichten möchtest. Die Vorlage generiert automatisch eine vorkonfigurierte Statusberichtsseite.
- Der Bericht enthält Tortendiagramme, die auf Feldern wie "Priorität" oder "Vorgangstyp" deines Jira-Projekts basieren.
- Passe deinen Bericht an, indem du verschiedene Felder auswählst, über die du berichten möchtest, und stelle sicher, dass er die Informationen hervorhebt, die für dein Team und deine Stakeholder am relevantesten sind.
Schau dir dieses Video mit einer Schritt-für-Schritt-Anleitung an:
Zusätzliche Ressourcen
5 Gründe, warum dein Jira-Team Confluence nutzen sollte
Schulungen zu Jira und Confluence von der Atlassian University
Jira und Confluence gemeinsam nutzen
Verwandte Ressourcen
Starte noch heute kostenlos mit Jira durch
CONFLUENCE-APPS UND -INTEGRATIONEN
Erfahre, wie du Confluence in deine bevorzugten Geschäftstools integrierst.
Confluence und Jira Service Management gemeinsam nutzen
Erfahre, wie du Confluence als Wissensdatenbank für deine Jira Service Management-Projekte nutzen kannst.