Utrzymaj kurs: dokumentowanie projektów za pomocą Confluence
która faktycznie przynosi dobre pomysły
Przeglądaj tematy
It doesn’t take much for a project to go off the rails. Maybe someone hits “reply all” and you start losing yourself in a tangle of project emails. Perhaps someone forgets to include a project brief which leaves half a dozen remote workers waiting for instructions. And without any real-time project progress visibility, there’s no way to get your bearings.
That may be why 70% of corporate errors arise out of poor communication, according to Gartner research. If your project documentation isn’t intuitive and easy to understand, it leaves everyone feeling out of the loop. Before you know it, you’ve blown past the deadline for the first milestone without any progress in sight.
That’s why you’ll need to create a central project documentation hub for your team. Fortunately, you can use Confluence as your project documentation platform to answer these challenges.
How project documentation in Confluence prevents complexity and keeps your project on track
A project without effective project documentation gets messy in a hurry. The more complex your project is, the more likely it is to go south. According to the Harvard Business Review: “projects are notoriously finicky, and success rates fall precipitously as they become larger, longer, and more complex.”
Think of project documentation as complexity-prevention. Project documentation will give you tools and a platform to address complexity before it infects every aspect of your initiative.
The solution? Use Confluence for your project documentation from the get-go, and let its features manage complexity for you.
Templates to get started
The first challenge is getting things off the ground. So turn to templates for both Confluence pages and spaces to kickstart your documentation and keep things smooth.

Have a unique strategic planning issue? Don’t sweat it. With Confluence, there are hundreds of templates to get you started on whatever your project needs are.
You’ll likely start with space templates, since these are essential for staying organized. You can select the space according to the kind of project you’re documenting, or you can create your own space, customizing parameters for specific teams at your company.
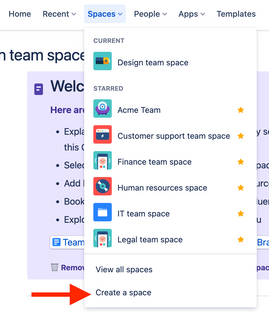
From there, you can build individual pages within those spaces to divvy up your projects. Let’s explore a few you can employ immediately:
- Project roadmaps: From the team mission to uploading essential project information files, this template is your tour guide. You can even take it long-term, using individual milestones like Q1 and Q2 to inform every project member which milestones you need to achieve by which dates.
- Master project documentation: Address the “why” behind your project. What are the pain points the project is addressing? What are the objectives your project should achieve? Then outline the exact stories you want your end-users to experience once you’ve achieved those milestones.
- Roles and responsibilities: “That wasn’t my responsibility.” Four words to ruin a project. But with the roles-and-responsibilities template, you can assign team members their specific roles. This way, you’ll have everyone on the same page: what you need to achieve, and which people are in charge of getting your project off the runway.
Strategic plans: Roll out an executive summary to present the overview of your project to executive leadership. Make sure you’ll have clear answers to questions they’ll ask: like “how we win” and “how we execute.”
Insert page elements to turn the documentation into something polished, robust, and easy to read across team members, stakeholders
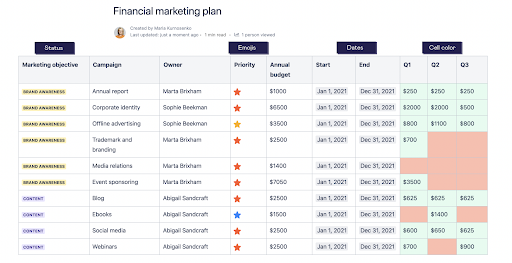
Within a specific Confluence page, you can insert unique elements (like action items within a checklist, or code snippets for developers) to better organize every idea. The result: your documentation isn’t just a handy reference doc. It’s something far more polished, robust, and easy for every stakeholder to use.
What page elements can you work with? You’ll have plenty of options:
- Action items use “@” mentions to tag a specific user for a follow-up. This mention then shows up as a checklist item under that user’s profile, which makes each day’s tasks easy to monitor—as well as highly collaborative.
- Code snippets let you format the source code with numbered rows and syntax highlighting—all based on the language you choose to employ.
- Dates can stand out from the surrounding context with unique highlights, which helps place emphasis on key project milestones.
- Dividers insert horizontal lines to distinguish between sections and keep your documentation easier to scan.
- Expanders allow you to collapse/expand different sections, which is great for keeping essential information without letting too much text dominate a page.
- Headings not only delineate between sections, but allow you to construct a dynamic table of contents overview for the entire page.
- Panels are easy-access, pre-built elements for specific sections like warnings, highlights, and notes, which let you call out key points.
Quotes differentiate between normal content and when you’re referencing someone else’s work.
Not only are these elements useful, but they’re easy to incorporate: just type “/quote,” for example, and you’re instantly formatting a new quote. The result: a finely-polished project documentation page that’s easy to read, digest, and scan—while keeping all team members in the loop.
Collaborative features for editing, comments, and feedback
“Too many cooks in the kitchen spoils the dish.” But a project may need all sorts of cooks.
The problem isn’t how many cooks you have; it’s the complex communication. If every email distraction or Slack notification throws off 23 minutes of work time, these wayward issues can lead to project delays.
The solution is to do everything within Confluence. Editing, comments, feedback, and questions should all go to the same place. If a user has a question about a project within Confluence, turning to their email inbox for an answer creates unnecessary busy work. It also means you’re losing track of key project details that might be exchanged in those email threads. When you search for them within your project management platform, those details are lost.
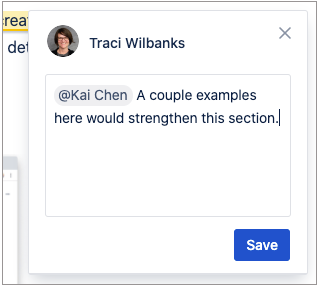
Confluence fixes this problem by bringing teams together in a document editor every user can view in real-time. You can work together in realtime or handle it in different time zones. Comment on pages or internal blog posts with pages and inline comments, for example. You’ll keep the team on the same page with a single source of truth for connecting on the project—no extra applications or lengthy email threads necessary.
Tracking progress with Jira
Integrate Confluence and Jira, and you’ll have something like a superhero crossover movie working in your favor. You can stack your superpowers using both tools without losing the advantages of either tool.
Jira’s features for helping your team track project work—including Epics for creating timelines, powerful agile scrum boards for separating to-do tasks from in-progress tasks, and generating reports and insights so you can see where you’re falling behind—are invaluable. But pair them with Confluence and you’ve got project documentation that can do even more.
For example, you can create an embedded Confluence page within Jira without leaving the project. Once again, this keeps the entire team on the same page—in this case, literally. And if there are issues that you need to resolve within Jira, you can add Confluence pages for the same reason.
Or you can use Confluence timelines with Jira. Insert a Jira timeline macro and you’ll seamlessly import an existing project’s timeline to your Confluence Cloud page. These timelines are easy to read, clearly define your milestones, and give you a bird’s-eye view of your project status.
You can also create Jira reports from within the Confluence cloud, keeping your Confluence project documentation on pace with everything happening within Jira. If a specific milestone is a few days behind, your report will let you know.
Use page history for any “oh no” moments
“Hold up.”
Two of the most fearsome words in project management. Everything is ticking along smoothly, the momentum of your project is starting to move downhill, and someone notices a bug or requests a quick revision.
Suddenly that schedule isn’t looking so attainable.
Of course, changes and revisions are just par for the course for any meticulously planned project. The key is to keep them contained to each specific milestone. Otherwise, changes and revisions become more than tweaks: they become complications that can leak out into the rest of the project and create all sorts of unnecessary distractions.
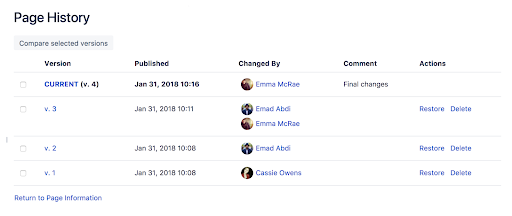
Confluence’s page history and page comparison views are great for getting tabs on all the changes in your project. Simply slide over to the specific page, click “More Options,” then view “Page history.” You’ll get a cavalcade of project management features:
- Version history: As with tools like Google Docs or Dropbox, you can check a “version history” if there’s a page you want to revisit. If you find your team over-editing an issue until it’s too well-done instead of medium-rare, you can simply click the version and see if it’s the one you want.
- Publishing dates: These dates help you refer to specific times within your project’s history. If you have a favorite version, run through your publishing dates to ensure you’re selecting the right one.
- Changed by: View the author who changed the most recent version. You may need to pick their brain and see what modifications they made, and why.
- Comment: Users who modify the project documentation can also leave a comment to contextualize their thought process. Was it a “final change?” A “proofread”? Are they handing it off to any particular user? Leaving a comment helps clarify the document history for anyone reviewing the changes.
Actions: You can either restore the old version or delete what you no longer need. This is essentially your time machine: you can change your project documentation to a page from when you thought everything was cleaner and more organized. Or you can use the “delete” tool to trim the versions you no longer need.
Key habits to keep your project documentation clean
You know that old phrase: cleanliness is next to godliness. The same logic applies to project documentation. Cleaner is better. The easier it is to identify milestones, find relevant project files, and track your progress against your goals, the smoother the process.
But Confluence project documentation is still just a tool. To keep your project documentation in line, you’ll want to enforce good habits with all your project documents:
- Standardize your naming conventions. Confluence project documentation will achieve a lot. But if you name one file “Project video #1” and another file “web seminar v02.B,” you’re going to lose some of the benefits of monitoring everything within Confluence. Use descriptive, consistent naming conventions for all relevant files to make them easier to search.
- Make full use of labels and descriptions. Confluence’s page history is great for rifling through old project documentation stages and monitoring your progress. But if you don’t accurately label these, you’ll only have extra sifting work when you review old documents.
Keep your project and team spaces clean with organized page trees. When a team works together, it can get easy to lose track of all the changes. Confluence keeps both project and team spaces clean with organized page trees, making all changes and feedback easy to nevigate.
Get your project on track—and keep it there—with Confluence project documentation
It’s true: a map is never quite as accurate as the real picture. But if you plan to get your projects moving, a good map of every stage will keep your momentum moving forward. Use Confluence project documentation features to their fullest, and you’ll have everything you need to unify a team under a single vision: getting the job done.

